
How to Unlock Bootloader on Google Pixel (2026 Guide) | All Models
📅 Updated: June 24, 2026 | ✅ Fact-checked & verified
Unlock bootloader on Google Pixel 6, 7, 8, 9 and all models using Fastboot commands. Complete step-by-step tutorial with prerequisites, warnings, troubleshooting, and what to do after unlocking.
Download ADB & Fastboot Platform Tools
Table of Contents
- Why Unlock Your Google Pixel Bootloader?
- Important Notes & Prerequisites (READ THIS FIRST!)
- How to Unlock Bootloader on Google Pixel? (2025 Fastboot Method)
- What to do After Unlocking the Bootloader?
- Video Guide
- FAQs
⚠️ Important Disclaimer
⚠️ WARNING: DATA LOSS & WARRANTY RISK
Unlocking the bootloader will perform a complete factory reset and erase ALL data on your phone. This may void your warranty. This guide is for educational and legitimate device customization on devices you own. The author is not responsible for any damage or data loss.
Why Unlock Your Google Pixel Bootloader?
Before we dive into the nitty-gritty, let’s talk about why you would even want to learn How to unlock Bootloader on Google Pixel in the first place. Think of the bootloader as a security guard for your phone’s operating system. It checks for a valid signature on your software to make sure no one has messed with it. On a stock phone, this is a great thing—it keeps you safe from malware and unauthorized system modifications. But when you want to customize your device, this security guard becomes a wall that blocks you from doing anything beyond what Google allows.
Unlocking the bootloader gives you the key to this wall. Once unlocked, you can flash custom firmware, install third-party recoveries, and gain root access. This opens up a world of possibilities for your Pixel device. It transforms your phone from a locked-down consumer device into a fully customizable platform that you truly control.
Custom ROMs
One of the most compelling reasons to unlock your bootloader is the ability to install Custom ROMs. A Custom ROM is essentially a different version of Android, built by the community, that offers features, performance, or a user interface that differs from what Google provides. Some popular Custom ROMs include LineageOS, GrapheneOS, CalyxOS, and Pixel Experience. Each of these ROMs offers something unique:
LineageOS: The most well-known Custom ROM, offering a clean, near-stock Android experience with added customization options and regular security updates.
GrapheneOS: A privacy and security-focused ROM that hardens the Android system against attacks and minimizes data collection. It’s a favorite among privacy enthusiasts.
CalyxOS: Another privacy-focused ROM that includes microG, an open-source implementation of Google Play Services, allowing you to use apps without the heavy Google tracking.
Pixel Experience: A ROM that aims to replicate the Google Pixel experience on non-Pixel devices, but can also be used on Pixels for a debloated, stock-like feel.
Evolution X: A feature-packed ROM with extensive customization options, giving you control over almost every aspect of the user interface.
This is a primary reason to unlock Pixel bootloader—to break free from the limitations of stock Android and experience something new and exciting. Custom ROMs often bring new life to older devices, extend software support beyond what Google offers, and give you features that stock Android doesn’t have.
Root Access
Gaining Root Access is another major benefit of unlocking the bootloader. Root access gives you complete administrative control over your device, similar to having administrator privileges on a Windows computer. This level of access lets you do things that are normally impossible on a stock device:
Install powerful apps: Apps like Titanium Backup (for full system backups), AdAway (for system-wide ad blocking), and Greenify (for aggressive battery saving) require root to function properly. These apps can significantly improve your device’s performance and usability.
System-level modifications: With root, you can modify system files, remove pre-installed bloatware, tweak the CPU governor for better performance or battery life, and change system animations. You can truly make the phone yours.
Use Magisk Modules: Magisk is the current standard for rooting Android devices. It allows you to install modules that modify your system without touching the actual system partition, making it easier to receive OTA updates. Magisk modules can add features like Viper4Android (advanced audio processing), Google Assistant integration, and much more.
Access hidden settings: Many Android settings are hidden from the user interface. With root, you can access these settings via tools like Tasker or terminal commands, automating tasks and customizing your device beyond what’s available in the standard settings menu.
Custom Recoveries
A Custom Recovery like TWRP (Team Win Recovery Project) is a third-party recovery environment that replaces the stock Android recovery. This is essential for advanced Android customization:
Full system backups: TWRP allows you to create a complete backup of your entire system, including apps, settings, and data (Nandroid backup). This means you can restore your phone to a working state if something goes wrong during customization.
Flashing ZIP files: You can flash ZIP files directly from TWRP, which is how you install Custom ROMs, Magisk, kernels, and other modifications. It’s the most common way to install custom software on your device.
Partition management: TWRP gives you access to advanced partition management tools, allowing you to wipe, format, and repair partitions. This can be a lifesaver if you encounter boot loops or other serious issues.
ADB sideload: You can use ADB sideload within TWRP to flash files without needing to mount storage or use a USB cable. This is useful if you’re having trouble with your USB connection.
Kernel Flashing
Flashing a Custom Kernel is another advanced customization option that becomes available after unlocking the bootloader. The kernel is the core of the Android operating system, responsible for managing hardware resources, memory, and processes. A custom kernel can:
Improve battery life: Custom kernels often include optimizations that reduce power consumption, extending your battery life significantly.
Enhance performance: Some kernels focus on performance, overclocking the CPU and GPU for smoother gaming and faster app loading times.
Add new features: Custom kernels can add features like advanced I/O schedulers, TCP congestion control algorithms, and support for additional file systems.
Improve sound quality: Some kernels include audio enhancements that improve the sound quality of your device’s speakers and headphone output.
Popular custom kernels for Google Pixel devices include ElementalX, Franco Kernel, and Kirisakura. Each offers different features and performance characteristics, allowing you to tailor your device’s performance to your specific needs.
Important Notes & Prerequisites (READ THIS FIRST!)
Before you start this Google Pixel bootloader unlock process, it’s crucial to understand the risks and prepare your device properly. Seriously, do not skip this section. I’m not just saying this for dramatic effect—I’ve seen countless people skip these steps and end up with data loss, frustrated, or with a phone that doesn’t work correctly. Take the time to read and understand these points before proceeding.
Data Wipe (Factory Reset)
Unlocking the bootloader will perform a complete factory reset and erase all data on your phone. This includes all apps, photos, contacts, messages, call logs, settings, and any other personal data stored on the internal storage. There is no way around this data loss during the unlock process—it’s a security feature built into the system to prevent unauthorized access to your personal information.
Back up all your important files to your computer or a cloud service before you proceed. Use Google’s built-in backup service, manually transfer files to your PC, or use a third-party backup app. Remember: if you don’t back it up, you will lose it.
Carrier Locking
Some carrier-locked devices (especially those from Verizon, AT&T, or certain T-Mobile variants) may have bootloader unlocking disabled. This is a common situation and is one of the most frequent sources of confusion for users trying to unlock their bootloader.
If you cannot find the “OEM unlocking” option in Developer options (or if it’s grayed out and unselectable), your phone might be locked to a carrier and cannot be unlocked by this method. In many cases, there is no way to unlock the bootloader on carrier-locked Pixel devices, particularly Verizon models. This is a hardware-level restriction that cannot be bypassed.
There are often complex carrier-specific workarounds for unlocking the network lock (allowing you to use the phone with a different carrier’s SIM card), but they are entirely different from unlocking the bootloader. Network unlocking does not enable bootloader unlocking.
Battery Life
Ensure your device is charged to at least 50%. A low battery during the process could lead to it shutting down unexpectedly, which can potentially brick your device (make it completely unusable). The bootloader unlock process itself is relatively quick, but you may also be performing other operations afterward (like flashing a custom ROM) that can take longer. It’s always safer to start with a full charge.
Warranty Void
Unlocking the bootloader can void your phone’s warranty. While some companies are more lenient than others, it’s best to assume that any issues you face after unlocking may not be covered by Google or your seller. Google’s warranty explicitly excludes damage caused by software modifications, and unlocking the bootloader is considered a software modification.
There is one caveat: if you can relock the bootloader and flash the stock firmware before sending the device in for repair, some companies may not detect the modification. However, Google devices keep a security flag that shows whether the bootloader was ever unlocked. Once unlocked, it cannot be completely hidden, and technicians can detect it during inspection.
Security Risk
An unlocked bootloader makes your device less secure against physical theft or malware. When the bootloader is unlocked, any malicious software or a person with physical access to your device could potentially flash unauthorized software without your knowledge.
Physical security: If someone steals your phone, they could flash custom firmware to bypass your lockscreen and access your data. This is why it’s crucial to use encryption and strong passwords even on unlocked devices.
Malware risk: Malware that gains root access can do significantly more damage than malware running on a locked device. It can install itself permanently, steal data, and even brick your device.
Verified Boot disabled: Verified Boot is a security feature that checks the integrity of your system at startup. When the bootloader is unlocked, Verified Boot is disabled, and you won’t receive warnings if your system has been tampered with.
Always be mindful of these added security risks. Use strong passwords, enable encryption, and be cautious about what software you install on an unlocked device.
How to Unlock Bootloader on Google Pixel? (2025 Fastboot Method)
With the warnings out of the way, let’s get this done. Follow these steps carefully, and you’ll have your Google Pixel bootloader unlocked in no time using the Fastboot method. I’ve broken this down into clear, manageable steps that even beginners can follow.
Step 1: Download Required Files
The first step is to get all the necessary tools on your computer. You’ll need two main things: the Android Platform Tools and the correct USB drivers. Both of these are essential for communicating with your device.
Platform Tools (ADB & Fastboot)
This is a small, essential package from Google that contains the adb and fastboot command-line tools. These are what we’ll use to communicate with your phone and send the commands that unlock the bootloader. The Platform Tools are updated regularly by Google, so it’s important to use the latest version.
ADB (Android Debug Bridge): This tool allows you to send commands to your phone while it’s booted into the operating system. We’ll use it to verify the connection and reboot into Fastboot mode.
Fastboot: This is the tool that actually unlocks the bootloader. It works when your phone is in Fastboot mode (a special low-level mode that allows direct hardware interaction).
Download ADB & Fastboot Platform Tools: Click here for the Link
Android USB Drivers (for Windows PC)
These drivers ensure your computer can properly recognize your Google Pixel phone in different modes, including fastboot. You’ll need these to make the connection work on Windows. Without these drivers, your computer will see your phone as an unknown device and won’t be able to communicate with it.
Download Universal Android USB Drivers: Click here for the Link
Mac and Linux users typically do not need to install separate drivers.
Once you’ve downloaded the files, extract the Platform Tools zip file to a location you can easily access on your computer, such as your desktop or C: drive. Remember this folder location—you’ll need to navigate to it in the command prompt later. I recommend extracting to C:\platform-tools on Windows for simplicity.
Step 2: Enable Developer Options & USB Debugging
Android has a hidden menu for developers. We need to unlock it to get the “OEM unlocking” and “USB debugging” options, which are essential for the Pixel Fastboot unlock process. These options are hidden by default to prevent accidental changes.
Go to your phone’s Settings > About phone.
Scroll down and tap “Build number” seven times in quick succession. A small message will pop up saying, “You are now a developer!” You’ll see a countdown as you tap, letting you know how many taps are left.
Go back to the main Settings menu and navigate to Settings > System > Developer options.
Inside the Developer options menu, find and enable two key toggles:
“OEM unlocking” — This option allows the bootloader to be unlocked. If this option is grayed out, your device is likely carrier-locked, and you won’t be able to proceed. This is a common issue on Verizon and AT&T models.
“USB debugging” — This allows your computer to communicate with your phone via ADB when it’s booted into Android. This is necessary for the
adbcommands we’ll use to reboot into Fastboot.
These two options are mandatory to proceed with the bootloader unlock. If “OEM unlocking” is grayed out, refer to the “Important Notes” section above regarding carrier-locked devices.
Step 3: Boot into Fastboot Mode
Fastboot is a critical diagnostic and engineering protocol that allows you to modify your Android’s file system directly from a computer. We need to put your phone in this mode to perform the Google Pixel bootloader unlock. Fastboot mode is a low-level environment that runs before the Android operating system loads, giving you direct access to the hardware.
First, power off your Google Pixel phone completely. Make sure it’s fully shut down, not just in sleep mode.
Now, press and hold the Volume Down and Power buttons simultaneously. Keep holding them until you see the Fastboot mode screen, which is usually an Android robot lying on its back with the word “Start” highlighted. The exact screen may vary slightly depending on your Pixel model, but it will clearly indicate that you’re in Fastboot mode.
Using a high-quality USB cable, connect your phone to your PC. This is where the USB drivers you downloaded earlier come into play. If the drivers aren’t installed correctly, your computer won’t recognize the device in Fastboot mode.
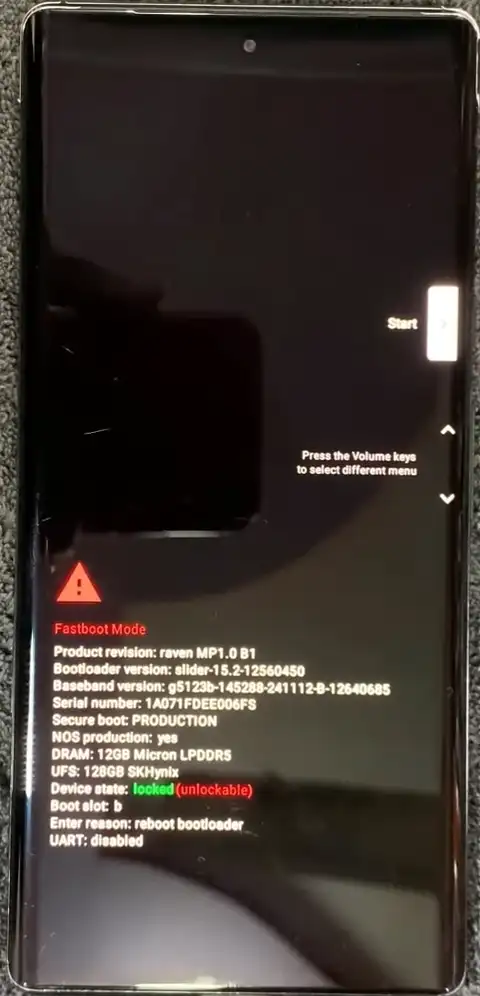
Google Pixel Phone with Locked Bootloader in Fastboot Mode.
Step 4: Verify Fastboot Connection
This is a crucial checkpoint. If your PC and phone aren’t talking to each other, the rest of the steps won’t work. I can’t stress this enough: if fastboot devices doesn’t show your device, stop and fix the connection before proceeding.
Navigate to the folder where you extracted the Platform Tools (from Step 1). For example, if you extracted to
C:\platform-tools, open that folder in File Explorer.Inside this folder, hold down the Shift key on your keyboard and Right Click an empty space. A context menu will appear.
Select “Open PowerShell window here” (or “Open Command Window here,” depending on your Windows version). A command prompt or PowerShell window will open, and the current directory will be set to your Platform Tools folder. This is important because it ensures the
fastbootcommands will work without needing to specify the full path.In the command window, type the following command and press Enter:
fastboot devicesIf your phone is properly connected, you should see a unique device ID followed by the word “fastboot.” If you don’t see anything, or if it says “waiting for device,” then your drivers aren’t installed correctly, or the cable is faulty. You’ll need to troubleshoot this connection before moving on.
Troubleshooting connection issues:
Try a different USB cable: Some cables are designed only for charging and don’t carry data. Use the cable that came with your phone or a known good data cable.
Try a different USB port: Some USB ports, especially those on USB hubs or front panels, may not provide a stable connection. Try a USB port directly on your motherboard (often on the back of the computer).
Reinstall drivers: Uninstall and reinstall the USB drivers. Sometimes the installation can become corrupted.
Check Device Manager: On Windows, open Device Manager and look for your phone. It may appear as “Android” or “Unknown Device.” If it’s not recognized, you may need to manually install the drivers.
Restart ADB server: Occasionally, the ADB server can get stuck. You can restart it with
adb kill-serverandadb start-server.
Step 5: Unlock the Bootloader
This is the big moment. This is the command that will change the status of your bootloader permanently. Once you confirm this step, there’s no going back without another factory reset.
In the same command window, type the following command and press Enter:
fastboot flashing unlockLook at your phone’s screen immediately. A warning message will appear, asking you to confirm the bootloader unlock. This warning is serious—it will remind you that unlocking the bootloader will wipe your data and void your warranty. Use the volume buttons to navigate to “Unlock the Bootloader” (or similar wording) and press the Power button to select it. This is your last chance to back out! If you select “No” or “Cancel,” the process will stop, and your phone will remain locked.
The phone will now perform the unlock and a factory reset. This will take a few minutes. The screen will show the progress, and the phone will reboot automatically once the process is complete.
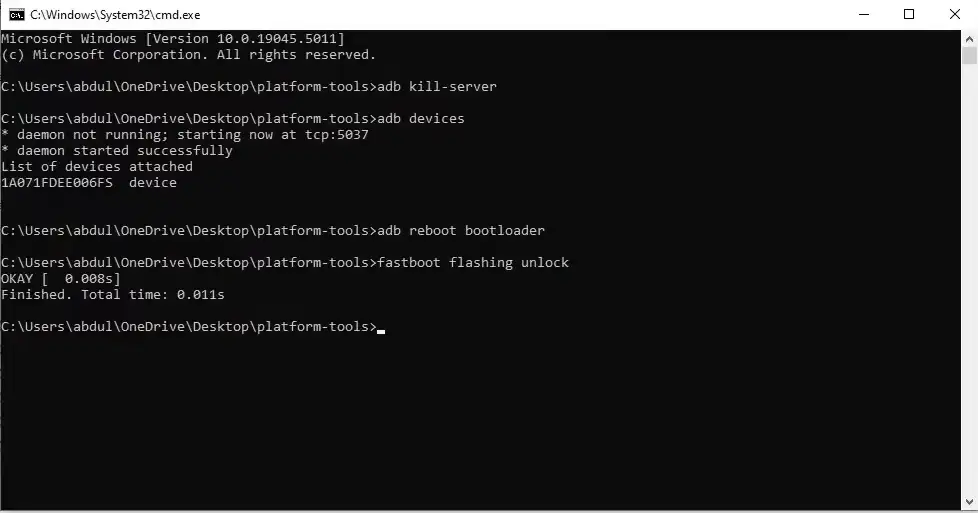
Fastboot command to unlock the bootloader: “fastboot flashing unlock”
Use Hard Keys
After entering the command, your phone will display a confirmation screen. Now press volume up or down to select “Unlock The Bootloader” option & then press power button to Confirm. This is where you confirm that you understand the risks and want to proceed.
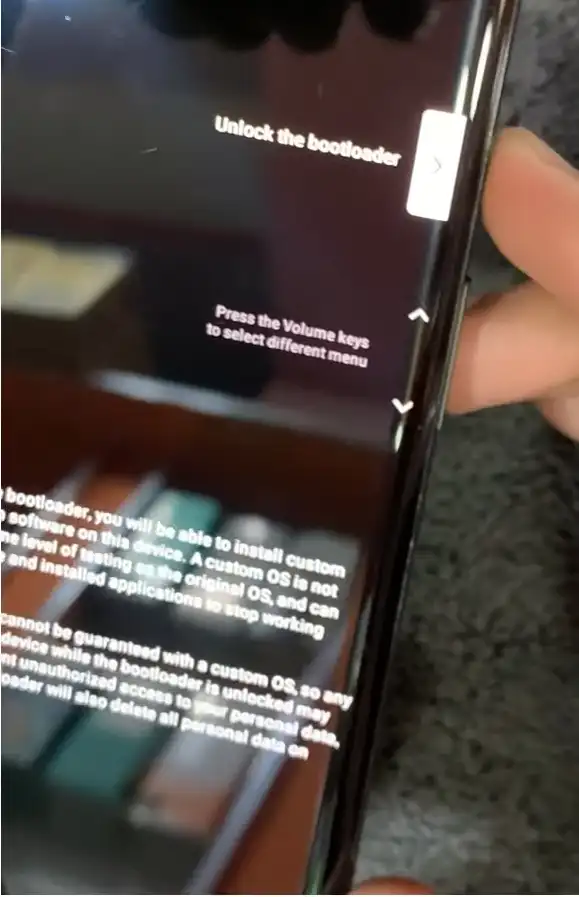
Using hard keys to unlock the bootloader on Google Pixel.
Verify Bootloader Unlock
After using hard keys, you will see the bootloader status is showing Unlocked in the fastboot mode. This confirms that the unlock was successful. The status will change from “LOCKED” to “UNLOCKED” at the top of the Fastboot screen.
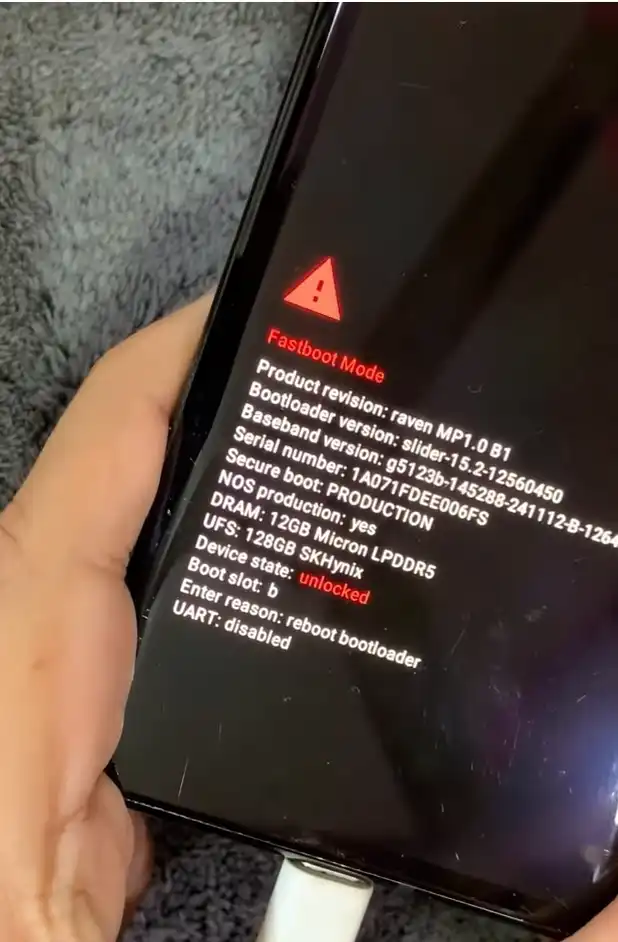
Google Pixel bootloader unlocked successfully after fastboot command.
Step 6: Reboot Your Device
Once the process is complete, you can manually reboot your device.
In the command window, enter:
fastboot rebootYour phone will restart with the bootloader unlocked! The first boot after a factory reset can take a bit longer than usual, so be patient. It may take 5-10 minutes to fully boot up.
You will also see a warning message every time you boot your phone, indicating that the bootloader is unlocked. This is normal and serves as a reminder that the device’s security is now in your hands. The warning will say something like “Your device is unlocked and can’t be trusted” or “The bootloader is unlocked.” This is not an error—it’s a security feature that Google implemented to alert you that the device’s integrity has been modified.
What to do After Unlocking the Bootloader?
Now that your bootloader is unlocked, the fun really begins! Your options are wide open, and you can finally start customizing your device to your liking. Here are some of the most popular next steps:
Root Your Phone
This is a very common next step. You can use tools like Magisk to achieve root access, which gives you full control over your device’s software. Rooting allows you to install powerful apps, remove system apps, and customize your device in ways that aren’t possible with stock Android.
To root your phone with Magisk:
Download the latest Magisk APK from the official GitHub repository.
Extract the boot image from your phone’s stock firmware.
Patch the boot image using Magisk on your phone.
Flash the patched boot image using Fastboot.
We’ll have a detailed guide on rooting with Magisk soon, so stay tuned to GSM6.com for that.
Flash a Custom Recovery
A custom recovery like TWRP (Team Win Recovery Project) is an essential tool for advanced Android customization. It allows you to install custom ROMs, flash Magisk, and perform full system backups (Nandroid backups). To install TWRP:
Download the TWRP image file for your specific Pixel model from the official TWRP website.
Boot your phone into Fastboot mode.
Flash the TWRP image using the command:
fastboot flash recovery twrp.imgOnce flashed, you can boot into recovery by pressing the appropriate key combination (usually Volume Down + Power).
Install a Custom ROM
Custom ROMs are community-built versions of Android that often include new features, better performance, or a debloated, stock experience. Some popular ROMs for Pixel devices include:
LineageOS: The most popular custom ROM, offering a clean, near-stock experience with regular updates.
GrapheneOS: A privacy-focused ROM that hardens Android security.
Pixel Experience: A ROM that recreates the Google Pixel experience with additional customization options.
Evolution X: A feature-rich ROM with extensive customization options.
To install a custom ROM:
Download the ROM and GApps (Google Apps) package for your specific device.
Boot into TWRP recovery.
Wipe system, data, and cache partitions.
Flash the ROM and GApps ZIP files.
Reboot your device and enjoy your new ROM!
We’ll have more detailed guides on all these topics coming soon to the site, so be sure to stick around and subscribe to our YouTube channel for video tutorials.
Watch the Full Video Tutorial: How to Unlock Bootloader on Google Pixel
For a clear, step-by-step visual guide on how to unlock the bootloader on Google Pixel, watch the full tutorial on my YouTube channel:
In this tutorial, I have used Google Pixel 6 (Raven) running on Android 15. I have uploaded a lot of other videos where I have unlocked the bootloader on Android 16 as well. I am using a desktop setup with Windows 10 64-bit, but this will work for Windows 7 to 11 all versions.
Video Tutorial
Watch this guide for visual instructions
Uploaded: February 15, 2025
Subscribe for more tutorials:
Frequently Asked Questions
What exactly is a bootloader and why is it locked on my Pixel?
The bootloader is a low-level program that runs first when you power on your phone. It is locked by Google to guarantee software security and integrity. This means it only lets your phone boot the official, approved Android system, preventing unofficial changes like custom ROMs. It acts as a gatekeeper, verifying the digital signature of the operating system before allowing it to load. If the signature doesn’t match Google’s official signature, the bootloader will refuse to boot the software, protecting you from potentially malicious modifications.
Will unlocking the bootloader erase my data?
Yes, it will. Running the fastboot flashing unlock command forces a complete factory reset. This is a built-in security step to stop unauthorized access to your private files. You must back up everything before you start the process. There is no way to bypass this data wipe—it’s a security feature designed to protect your personal information if someone tries to unlock your device without your permission.
Does unlocking the bootloader void the warranty on my Google Pixel?
In most cases, yes. While the law in some regions (like the Magnuson-Moss Act in the US) makes it hard for a company to automatically void the warranty, Google can refuse to cover any damage that they can prove was caused by software modifications made after the bootloader was unlocked. It is a big risk. If your device fails due to a hardware issue, Google may still honor the warranty. However, if the failure is related to software, firmware, or any modification you made, they can refuse service.
Is the fastboot flashing unlock command the correct one for all new Pixel phones?
Yes. For modern Google Pixel devices (Pixel 6, 7, 8, 9, etc.), the correct command is fastboot flashing unlock. The old command, fastboot oem unlock, is now outdated and will not work on new Pixel models. Always use the fastboot flashing unlock command for devices running Android 8.0 and later. Using the wrong command will result in an error.
Is it legal to unlock the bootloader on my own Pixel phone?
Yes, it is legal in the United States and many other countries to unlock the bootloader on a device you own. However, this does not change the terms of your warranty or carrier contract. Unlocking the bootloader is your right as the owner of the device, but you must accept the consequences, including warranty voidance and potential security risks.
I get a “waiting for any device” error. How do I fix the fastboot connection?
This means your computer cannot see your phone in Fastboot Mode. The problem is usually with the drivers or the cable. Fix it by: 1) Reinstalling the Android USB drivers (Step 1). 2) Trying a different, high-quality USB cable. 3) Using a different USB port on your PC (avoid USB hubs, especially if they’re not powered). 4) Restarting your PC. 5) Trying a different computer to isolate the issue.
The command fastboot flashing unlock gives me a FAILED message. Why?
The most common reason for this bootloader unlock failure is that you did not enable the “OEM unlocking” option in Developer options (Step 2). You must enable this toggle while the phone is booted into Android before you can use the fastboot command. Other reasons include using the wrong command or the phone not being in Fastboot mode correctly.
I see the “OEM unlocking” toggle, but it is grayed out. What does that mean?
This means your phone’s bootloader is permanently restricted. This is usually the case for Verizon-locked Pixel phones or devices sold by specific carriers that forbid bootloader modification. If the option is grayed out, you cannot use this guide to unlock the bootloader. There is no known workaround for carrier-locked Pixel devices—it’s a hardware-level restriction that cannot be bypassed.
Do I need to be connected to Wi-Fi to enable the “OEM unlocking” option?
Yes, sometimes. On some Pixel models, the phone must be connected to the internet to check its status with Google’s servers before it allows you to enable the “OEM unlocking” toggle. If the option is grayed out, try connecting to Wi-Fi for a few minutes and checking again. The phone needs to verify with Google that the device isn’t reported stolen or lost before allowing bootloader unlocking.
After enabling “USB Debugging,” my PC still says “device unauthorized.” How do I proceed?
When you connect your phone to the PC after enabling USB Debugging, a pop-up window must appear on your phone asking you to “Allow USB debugging.” You must tap “Allow” and ideally check the box for “Always allow from this computer.” If you do not see this pop-up, you might need to revoke USB debugging authorizations in the Developer options and try connecting again. Sometimes, restarting both your phone and your computer can also help.
Will unlocking the bootloader affect my phone’s ability to receive official OTA software updates?
Yes. Once the bootloader is unlocked, the phone’s built-in check for official updates (called Verified Boot) will fail. You will usually have to manually flash the full factory image (using a special flash-all.sh script) every time an update is released, or use a custom tool like Magisk to handle updates. OTA updates will still download, but they will fail to install due to the modified bootloader state.
Will my banking apps or Google Pay stop working after I unlock the bootloader?
Most likely, yes. Many financial and streaming apps use a security check (called Play Integrity or SafetyNet) that fails on devices with an unlocked bootloader. To fix this, you would need to root your phone (using Magisk) and install special modules to hide the unlocked status from these apps. This is a cat-and-mouse game—Google frequently updates Play Integrity, and Magisk developers quickly update their modules to bypass the new checks.
Can I re-lock the bootloader after I am done with customization?
Yes, you can. You can re-lock the bootloader by running the command fastboot flashing lock in Fastboot Mode. This will also trigger another full factory reset. It is a necessary step if you want to flash the phone with the official firmware and restore the highest level of security. Re-locking the bootloader will restore Verified Boot and allow your device to pass security checks again.
Does unlocking the bootloader automatically root my Pixel phone?
No. Unlocking the bootloader is only the first step. It is the key to the castle, but it does not give you root access. After unlocking, you must then flash a patched boot image (usually created with Magisk) to gain full root access. Bootloader unlock simply removes the restriction that prevented you from flashing custom software. Root access requires additional steps.
What is “fastboot flashing unlock_critical” and do I need to run it?
This command unlocks certain “critical partitions” of the phone that hold very low-level firmware. It is usually only needed for very advanced actions, such as recovering a phone that has been hard-bricked or flashing extremely low-level firmware. For standard rooting and custom ROMs, you only need the regular fastboot flashing unlock command. It is generally safer to avoid unlocking critical sections unless absolutely necessary, as doing so can permanently damage your device if something goes wrong.
Is this bootloader unlock guide specific to the Pixel 8 Pro?
No. This official fastboot unlock guide works for almost all Google Pixel models, including the Pixel 8, Pixel 7 Pro, Pixel 6, and earlier generations. The core ADB/Fastboot commands are universal across all unlockable Pixel phones. However, the exact confirmation screen may vary slightly between different Pixel models. The steps remain the same regardless of the model.
Is it safe to buy a used Pixel with an already unlocked bootloader?
It is a risk. An unlocked bootloader means the previous owner could have installed any kind of software. If you buy a used phone with an unlocked bootloader, you should immediately flash the latest official factory image from Google and then re-lock the bootloader for maximum security before setting it up as your own. This will ensure that the device is running clean, official software and that no hidden malware or modifications are present.
What is the “unlocked bootloader” warning screen that appears at startup?
After you unlock the bootloader, a warning message appears every time the phone boots. It is a safety feature from Google that simply tells you the device’s original security integrity is compromised. It is a permanent and normal side effect of the Pixel bootloader unlock. The warning cannot be removed, but it’s harmless and only appears for a few seconds during boot.
Can I use this guide to unlock the bootloader on a Samsung or a different non-Pixel Android phone?
No. While the basic ADB/Fastboot tools are universal, the command and process are different. Samsung, for example, uses a tool called Odin. Other brands often have waiting periods or completely different methods. This guide is strictly for the Google Pixel bootloader unlock. Attempting to use these commands on a different brand may not work and could potentially damage your device.
Can I use the Android Flash Tool to unlock the bootloader instead of typing commands?
The Android Flash Tool, found on Google’s website, is used for flashing official factory images. While it can install a fresh stock ROM easily, it does not typically unlock the bootloader itself. You still need to manually run the fastboot flashing unlock command after putting the device in Fastboot Mode. It is best to stick to the direct command line for the actual unlock process. The Android Flash Tool is great for flashing, but not for unlocking.
Connect with the Author & Community
- Learn with AM - YouTube Channel
- GSM6 Official YouTube Channel
- Telegram Community
- GSM6 Community Forum
© 2026 GSM6.com | Google Pixel Bootloader Unlock Guide
This guide is provided for educational and legitimate device customization purposes.
Unlocking bootloader may void your warranty. Always backup your data before proceeding.


Author:
Abdul MalikMobile Software Expert and founder of GSM6.com. Specializes in FRP bypass, IMEI repair, and advanced mobile tools. All tutorials are tested on real devices for accuracy and safety.


