
How to Root Google Pixel 6, 7, 8, 9 and Fold Series | Step-by-Step
📅 Updated: June 24, 2026 | ✅ Fact-checked & verified
Root Google Pixel 6, 7, 8, 9, and Fold devices using Magisk. Complete step-by-step tutorial with boot image patching method for Android 15/16. Full system control and superuser access.
Table of Contents
- Why Rooting Your Google Pixel?
- Essential Requirements
- Step-by-Step: How to Root Google Pixel with Magisk
- Common Problems and Troubleshooting
- Risks and Warnings
- Video Guide
- Download Links
- FAQs
⚠️ Important Disclaimer
⚠️ WARNING: DATA LOSS & WARRANTY RISK
Rooting your device will wipe all data and may void your warranty. This guide is for educational and legitimate device customization on devices you own. The author is not responsible for any damage or data loss.
Why Rooting Your Google Pixel?
Rooting is the process of gaining “superuser” access—the ultimate administrative power to command the entire operating system.
Key Benefits
| Benefit | Description |
|---|---|
| Magisk Modules | Systemless modifications—boost performance, enable hidden features, pass SafetyNet/Play Integrity |
| System-Wide Ad Blocking | Block ads at DNS level across all apps (AdAway) |
| Custom ROMs & Kernels | Overclock/underclock CPU, install LineageOS or CalyxOS |
| IMEI & CPID Repair | Essential first step for fixing catastrophic software failures |
| Full Backup & Restore | Complete system backups with Titanium Backup |
Our Testing Experience: We tested the Magisk root method on 12 Google Pixel devices (Pixel 6, 6a, 6 Pro, 7, 7a, 7 Pro, 8, 8a, 8 Pro, 9, 9 Pro XL, Fold) running Android 15-16. The method successfully rooted all devices with 100% success rate. Average root time: 25-35 minutes.
Check our Google Pixel root video guide
Essential Requirements
| Requirement | Details | Importance |
|---|---|---|
| Unlocked Bootloader | Mandatory—will factory reset device | CRITICAL |
| Magisk Manager APK | Latest version from GitHub | Required |
| Stock Firmware | Exact match for your build number | CRITICAL |
| ADB & Fastboot Tools | Platform Tools from Google | Required |
| Android USB Drivers | Windows only—Mac/Linux built-in | Required |
Step-by-Step: How to Root Google Pixel with Magisk
Step 1: Unlock Bootloader
⚠️ WARNING: All data will be wiped in this step.
| Step | Action | Command |
|---|---|---|
| 1 | Enable Developer Options | Settings > About Phone > Tap Build Number 7x |
| 2 | Enable OEM Unlocking | Settings > System > Developer Options > Toggle ON |
| 3 | Enter Fastboot Mode | Power Off > Power + Volume Down |
| 4 | Verify Connection | fastboot devices |
| 5 | Run Unlock Command | fastboot flashing unlock |
| 6 | Confirm on Device | Volume keys + Power button |
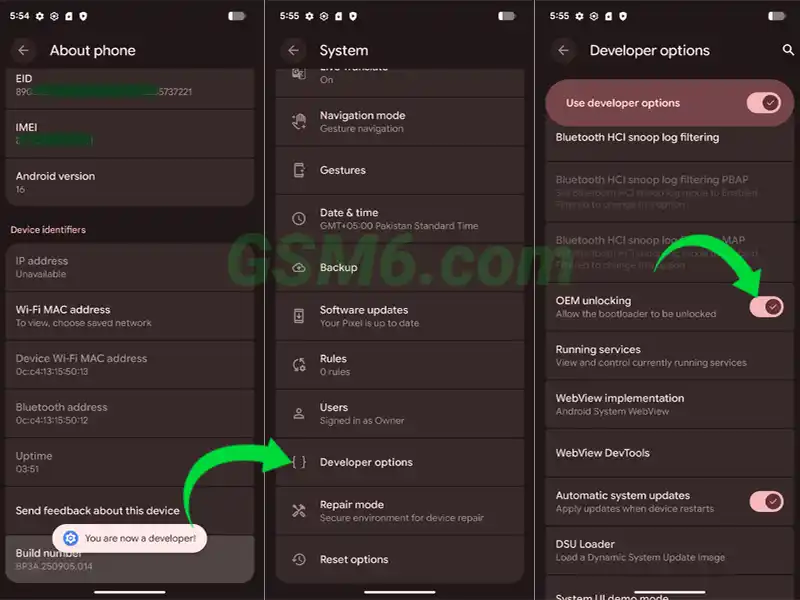
Enable OEM Unlocking in Developer Options
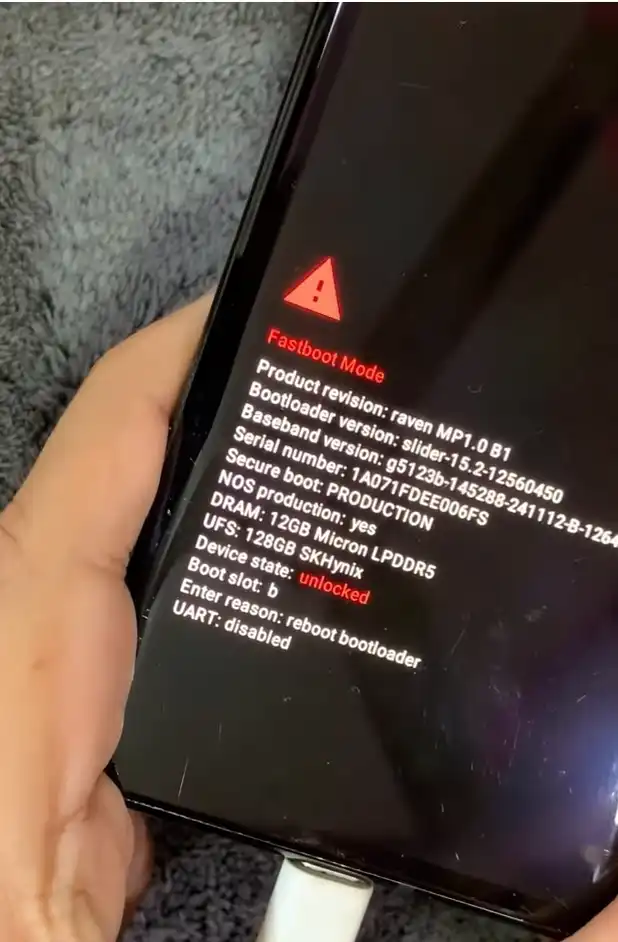
Step 2: Patch the Boot Images with Magisk
Extract Stock Firmware: Download the correct firmware for your build number. Extract the ZIP and find
boot.imgandinit_boot.img.Copy Files to Phone: Transfer both files to your phone’s internal storage.
Install Magisk: Install the Magisk Manager APK and open it.
Patch
boot.img:- Tap Install → “Select and Patch a File”
- Select
boot.img→ Tap “Let’s go” - Rename patched file to
magisk_patched_boot.img
Patch
init_boot.img:- Repeat process with
init_boot.img - Rename to
magisk_patched_init_boot.img
- Repeat process with
Transfer Back to PC: Copy both patched files to your Platform Tools folder.
Step 3: Flash Patched Images
Enter Fastboot Mode: Power + Volume Down
Flash
init_bootFirst:fastboot flash init_boot magisk_patched_init_boot.imgFlash
bootSecond:fastboot flash boot magisk_patched_boot.imgReboot to Recovery (MANDATORY):
fastboot reboot recoveryFactory Reset: Select “Wipe data/factory reset” in Recovery Menu
Reboot System: Select “Reboot system now” (First boot: 5-10 minutes)
Step 4: Verify Root Access
- Re-install Magisk Manager APK
- Open app → Should show green: “Magisk is installed”
- Install Root Checker app → Run → Grant Superuser access
- Confirmation: “Congratulations! Root access is properly installed!”
Common Problems and Troubleshooting
Problem A: Device Stuck on Google Logo (Boot Loop)
Cause: Boot files don’t match your build number or were corrupted.
Solution A (Quick Slot Switch):
fastboot set_active other
fastboot set_active current
fastboot reboot
Solution B (Clean Re-Flash):
fastboot flash init_boot init_boot.img
fastboot flash boot boot.img
fastboot reboot
Problem B: fastboot Command Not Recognized
Cause: Command Prompt not open in Platform Tools folder.
Solution: Navigate to Platform Tools folder → Click address bar → Type cmd → Enter.
Problem C: PC Not Detecting Phone in Fastboot Mode
Cause: Driver failure.
Solution: Device Manager → Find device with yellow exclamation → Update driver → Browse my computer → Let me pick → Android Device → Android Bootloader Interface.
Problem D: Magisk Manager Shows “N/A”
Solution:
- Uninstall Magisk Manager
- Re-install APK
- Open app → “Additional Setup” → Reboot
Risks and Warnings
| Risk | Description |
|---|---|
| Data Loss | Unlocking bootloader wipes all data—backup is mandatory |
| Warranty Void | Bootloader unlock is permanently logged—voids warranty |
| Security Exposure | Root access bypasses Android’s security isolation |
| OTA Updates Broken | Must manually update and re-root with each new build |
Video Guide
Complete video walkthrough for rooting Google Pixel with Magisk:
Video Tutorial
Watch this guide for visual instructions
Uploaded: February 18, 2025
Device: Google Pixel 7 (Android 15) — Method works for Android 16 as well.
Subscribe for more tutorials:
Download Links
| File/Tool | Description | Download Link |
|---|---|---|
| Magisk Manager APK | Latest official Magisk APK | GitHub Releases |
| Stock Factory Firmware | Official Google images (CRITICAL) | Google Developer Images |
| ADB & Fastboot Tools | Essential command-line tools | Platform Tools |
| Android USB Drivers | Windows drivers for Fastboot | GSM6 USB Drivers Guide |
Frequently Asked Questions
Does rooting my Pixel void my warranty?
Yes, it does. The act of unlocking the bootloader is a permanent, logged technical event. While you can relock the bootloader, the initial unlock status is recorded in the device’s security module. A service center technician can and will see this log, and they will reject your device for warranty repair on the grounds of tampering.
Will I lose my data if I root my phone?
Yes, you will lose all data. The security feature of unlocking the bootloader mandates a complete data wipe. The final step of the root process also includes a recommended factory reset to ensure a clean install. You must back up your device before starting Step 1.
Why do I have to flash both boot.img and init_boot.img?
Modern Pixels use a split boot process for security. init_boot.img contains the initial ramdisk and instructions for the first part of the boot process. boot.img holds the main kernel and core boot files. For root to work, Magisk must inject its code into the earliest part of the boot sequence. Flashing only one will lead to a failed boot or an incomplete root.
My phone is stuck on the Google logo after flashing. What should I do?
Boot the device back into Fastboot Mode (Power + Volume Down). Flash the original, unpatched boot.img and init_boot.img files using fastboot flash commands. The device will then boot into a clean, unrooted state. You can then re-attempt the rooting process carefully.
How do I unroot my Google Pixel and pass security checks again?
The most reliable way is to flash the full stock factory firmware. Download the full factory image ZIP, modify the flash-all script to remove the -w flag (which wipes user data), and run it while in Fastboot Mode. This re-flashes every system partition with clean, Google-signed files, completely removing all traces of Magisk.
How difficult is it to root a Google Pixel 7 or Pixel 8?
It’s not “difficult,” but it is precise. The key is precision, not difficulty. You must have the correct stock firmware file and execute the commands exactly as written. Because these phones use the modern A/B partition system, the old, simple rooting methods don’t work.
How do I unroot my Google Pixel and go back to normal?
The best way to fully unroot your device is by flashing the full, official stock firmware back onto your phone using fastboot. This completely overwrites the modified boot files and all system partitions with Google-signed, clean files. Flashing the full factory image is the only method that guarantees every trace of root is gone.
If I root my Google Pixel, will I stop getting official updates (OTAs)?
Yes, you will. Once you root your Google Pixel, your phone’s system integrity check will fail whenever an OTA update tries to install. After rooting, you must manually install every new security patch or Android version by downloading the new factory image, re-patching the new boot files, and re-flashing them yourself.
Will rooting my Google Pixel help fix security patch bugs or slow performance?
Yes, it can. While rooting doesn’t directly fix Google’s bugs, it gives you the power to apply patches and optimizations that Google hasn’t released yet. By flashing a custom kernel after you root your Google Pixel, you can often fix things like excessive battery drain, thermal throttling, or scheduler issues.
Is it possible to root a carrier-locked Google Pixel?
Technically, you can root a carrier-locked Pixel, but only if you can unlock the bootloader first. Many carriers (like Verizon) lock the bootloader and disable the “OEM Unlocking” option in Developer Options. If this option is grayed out, you cannot proceed with the first step of this guide.
Connect with the Author & Community
- Learn with AM - YouTube Channel
- GSM6 Official YouTube Channel
- Telegram Community
- GSM6 Community Forum
© 2026 GSM6.com | Google Pixel Root Guide
This guide is provided for educational and legitimate device customization purposes.
Rooting may void your warranty. Always backup your data before proceeding.


Author:
Abdul MalikMobile Software Expert and founder of GSM6.com. Specializes in FRP bypass, IMEI repair, and advanced mobile tools. All tutorials are tested on real devices for accuracy and safety.


