• Abdul Malik (AM) • android • 1 min
Master Guide to OnePlus Flashing and Unbricking with Official MSMDownloadTool (Android 9/10/11)
Are you looking for the deepest knowledge and the safest OnePlus flash file download links to finally unbrick that dead device, downgrade from a broken update, or repair OnePlus IMEI after update wiped it out? Stop searching. You are now at the source of the rough, technical truth. This is not some general, light guide. We are going into the Emergency Download Mode (EDL)”the lowest level of the hardware”where the real magic happens.
For any serious modification, troubleshooting, or deep system repair, working on Android 9, Android 10, or Android 11 firmware is not just preferred, it is essential. Newer versions of OxygenOS and ColorOS have locked down the critical access points that we, as technical users, rely on. We need to go back to the rock-solid base that the MSMDownloadTool supports best.
Why Older Firmware is Your Lifeline: Understanding the Security Gates
If you work with OnePlus devices, especially models from the OnePlus 6 series up to the OnePlus 9 series, you need to know this hard truth: the jump to Android 12 and 13 changed everything. These newer software versions bring harsh security measures, especially around the core hardware access that an official service center or expert technician needs.
The main problem is the DIAG Port. This is the secret door to the Qualcomm Snapdragon chipset’s radio configuration, where files like the EFS partition are housed. The EFS partition contains your device’s soul: the Baseband version and the all-important IMEI number.
Android 11 and below: The DIAG Port is generally accessible, often without even needing to root the device. You can connect specialized tools (like QPST/QFIL) and, crucially, fix the Baseband unknown no signal issue by restoring your original EFS backup.
Android 12 and above: OnePlus and the chipset makers locked this port down tight. Access is either impossible, requires an official, authorized service account, or demands tricky root-level exploits that often break after the next small update.
By flashing back to a secure, earlier version”specifically Android 11 firmware or below”we temporarily remove these restrictions. This gives you the window of opportunity to perform the deep-level fixes, especially when your device is hard-bricked or suffering from IMEI null errors.
LEGAL DISCLAIMER: THIS GUIDE IS FOR EDUCATIONAL AND REPAIR PURPOSES ONLY. YOU MUST USE YOUR ORIGINAL, LEGALLY OWNED IMEI/SERIAL NUMBER. WE DO NOT CONDONE OR SUPPORT THE USE OF ILLEGAL OR STOLEN IDENTIFIERS. FOLLOW YOUR COUNTRY’S LAWS. PROCEED AT YOUR OWN RISK.
OnePlus Stock ROM Flash File Download FREE: Accessing Official Tools
The key to completely reviving a hard-bricked OnePlus is using the factory-level tool: the MSMDownloadTool. This tool works by communicating directly with the Qualcomm HS-USB QDLoader 9008 mode, also known as EDL Mode. This is a state where the phone’s CPU is just waiting for a raw, signed firmware image”it bypasses the corrupted bootloader and system partitions.
MSM Download Tool
We have compiled the official, most stable OnePlus Flash File Download links. These links direct you to the full factory images (often called OPS files) that are packaged specifically for the MSMDownloadTool process. Always use the file that matches your phone model and region (Global, India, EU, T-Mobile) to avoid errors like “Image does not match hardware”.
Official MSMDownloadTool Packages by Model
| OnePlus Phone Model | Official MSM Tool Package Link |
|---|---|
| OnePlus 2 | OnePlus 2 MSM Tool |
| OnePlus 3 | OnePlus 3 MSM Tool |
| OnePlus 3T | OnePlus 3T MSM Tool |
| OnePlus 5 | OnePlus 5 MSM Tool |
| OnePlus 5T | OnePlus 5T MSM Tool |
| OnePlus 6 | OnePlus 6 MSM Tool |
| OnePlus 6T | OnePlus 6T MSM Tool |
| OnePlus 7 | OnePlus 7 MSM Tool |
| OnePlus 7T | OnePlus 7T MSM Tool |
| OnePlus 7T Pro | OnePlus 7T Pro MSM Tool |
| OnePlus 7 Pro | OnePlus 7 Pro MSM Tool |
| OnePlus 8 | OnePlus 8 MSM Tool |
| OnePlus 8T | OnePlus 8T MSM Tool |
| OnePlus 8 Pro | OnePlus 8 Pro MSM Tool |
| OnePlus 9 | OnePlus 9 MSM Tool |
| OnePlus 9R | OnePlus 9R MSM Tool |
| OnePlus 9 Pro | OnePlus 9 Pro MSM Tool |
| OnePlus Nord | OnePlus Nord MSM Tool |
| OnePlus Nord CE | OnePlus Nord CE MSM Tool |
| OnePlus Nord N10 5G | OnePlus Nord N10 5G MSM Tool |
| OnePlus Nord N100 | OnePlus Nord N100 MSM Tool |
| OnePlus Nord N200 | OnePlus Nord N200 MSM Tool |
Pro Tip for Fixing Baseband: If you are trying to repair Baseband no signal or restore your EFS partition, always downgrade OnePlus Android 12 to 11 EDL mode first. Flashing the official Android 11 firmware using MSMDownloadTool sets the system back to a configuration where technical repairs are far simpler and safer. This is the foundation of fixing deep network issues.
The Deep Fix: When You Need to Flash Stock Firmware in EDL Mode
You don’t flash a stock ROM on a OnePlus device just for fun. You do it when a deep-seated issue cannot be fixed by a simple factory reset or a recovery flash.
The Critical Scenarios That Demand MSMDownloadTool:
Hard-Bricked State (Dead Device): The phone is totally dead. No boot screen, no fastboot, no recovery”it shows up in Windows Device Manager only as Qualcomm HS-USB QDLoader 9008. This is the ultimate brick, and the MSMDownloadTool is the only tool that can talk to it at this level. This process completely rewrites the core low-level partitions, restoring the phone from a true death state.
IMEI Null / Baseband Unknown: This happens often after a bad flash, a corrupted EFS partition, or an interrupted update. Your phone cannot connect to any network because it has lost its unique identifier (IMEI). By flashing the Android 11 firmware via EDL mode, you restore the entire radio stack, giving you the clean slate necessary to perform the final IMEI restore using your legally owned backup.
Permanent Bootloop / Soft-Brick: The device is stuck on the OnePlus logo or constantly rebooting. Standard methods fail. EDL flashing bypasses the endless loop by ignoring the corrupt software and installing a fresh, signed OS directly to the flash memory.
Downgrading from Android 12/13: When you need the flexibility of older software (for easier rooting, custom ROMs, or technical repair access), forcing a downgrade OnePlus Android 12 to 11 via the MSMDownloadTool is the safest, most comprehensive way to roll back the entire system, including the bootloader and modem firmware.
Full Benefits of Flashing Android 9/10/11 on OnePlus:
By executing an EDL flash, you are achieving a level of repair authority that no other consumer tool offers.
Access the DIAG Port Easily: This is the biggest win. It’s the critical step for any repair baseband no signal or EFS partition restore operation. With older firmware, this port is open, giving professional tools (like QPST, QFIL, or specialized modem tools) direct, low-level access to rewrite the device’s radio configuration with your original backup data.
Complete Bootloader State Reset: MSMDownloadTool doesn’t care if your bootloader is locked or unlocked, corrupt or functional. It resets it to a factory-fresh, locked state, ensuring maximum security and a clean start. This is the safest way to unbrick a device that got bricked by trying to relock the bootloader with custom software still installed.
Unbrick Without Authorized Accounts: For many new devices, flashing in EDL mode requires an authenticated account. Since the files and tool we use here are the official factory service tools (often leaked or shared by the community), they generally bypass these account checks for the pre-Android 12 devices, giving you, the user, the power to fix your own property.
Downgrade Safely and Completely: Rolling back Android versions is tricky due to anti-rollback mechanisms. EDL flashing overrides these checks by replacing all partitions, not just the OS partitions, making the downgrade OnePlus Android 12 to 11 EDL mode process robust and reliable.
OnePlus Flash File Download & Install by using MSM Download Tool: The Technical Workflow
This step-by-step guide is the raw truth of flashing. Every step is crucial. Do not rush. Make sure your computer is stable, and your phone has sufficient battery (though in EDL mode, power is drawn mostly from the USB).
What Tools You Will Need:
MSMDownloadTool: The essential, factory-level flashing utility. You must use the version bundled with the flash file for your specific model.
Official OnePlus Qualcomm USB Drivers: These drivers are mandatory. They allow your PC to correctly recognize the device when it enters the low-level Qualcomm HS-USB QDLoader 9008 mode. If this step fails, the entire process stops at the “Device Not Recognized” error.
Official OnePlus Flash File: The specific OPS file for your model and region (downloaded from the list above).
Minimal ADB & Fastboot Tool: Needed to issue the
adb reboot edlcommand if the device is not hard-bricked, or to check for connectivity before the flash.High-Quality USB-C Cable: This is often overlooked. A poor cable can cause the connection to drop, resulting in a Sahara Communication Failed error, which can further damage the software. Use the original OnePlus cable or a certified alternative.
Windows PC: MSMDownloadTool is a Windows utility and should always be run with Administrator privileges.
The Step-by-Step EDL Flashing Guide
Step 1: The Full System Backup (The Data Defense Layer)
Before you touch any flashing tool, the very first, non-negotiable step is a full backup. Flashing wipes everything. It performs a full format of the user data partition. You must get your photos, contacts, app data, and most critically, your EFS partition backup, if possible.
Action: Use a trusted tool to make a full Nandroid backup if you have custom recovery (like TWRP). If the phone can still boot, use the built-in OnePlus Switch tool or a cloud backup. The data wipe is necessary for a clean flash, but losing your personal files is a tragedy you can avoid.
Step 2: Installing the Qualcomm HS-USB QDLoader 9008 Drivers
The computer needs to know what the bricked phone is. When a Qualcomm Snapdragon device enters EDL mode, it identifies itself to the PC using a specific hardware ID that Windows translates into the Qualcomm HS-USB QDLoader 9008 COM port.
Action: Download and install the official OnePlus/Qualcomm drivers. You may need to temporarily disable Windows Driver Signature Enforcement to ensure the older, necessary driver files are allowed to load. Go to Device Manager, and when you plug the device in (in the next step), you must see the device listed under Ports (COM & LPT) as Qualcomm HS-USB QDLoader 9008 (COMx). If you see “Unknown Device” or anything else, the drivers are wrong.
Step 3: Booting the Device into Emergency Download (EDL) Mode
This is the critical low-level access point.
Action: This depends on the device state.
If soft-bricked (Fastboot/Recovery is available): Open Command Prompt in your ADB/Fastboot folder and type
adb reboot edl. The screen will go black, and the device will enter 9008 mode.If hard-bricked (Screen is black): Power off the device completely. Hold down the Volume Up and Volume Down buttons simultaneously. While holding them, plug the USB cable (already connected to the PC) into the phone. The phone will vibrate briefly, the screen will remain black, and the 9008 port should appear in Device Manager.
Step 4: Setting Up and Running MSMDownloadTool
The tool must be set up correctly to initiate the low-level factory flash.
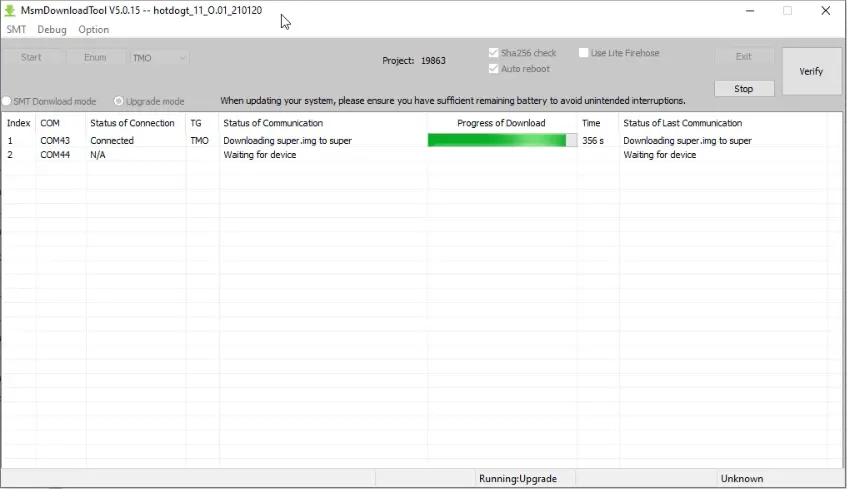
Action: Open the MSMDownloadTool folder. Right-click the executable file and select Run as Administrator. Do not skip this. In the tool window, select your Target (India, Global, T-Mobile, etc.) that matches your flash file. The program will automatically scan for the phone’s COM Port (the 9008 connection). Wait until it shows “Connected” or the COM number of your device.
Step 5: Flash the ROM (The Point of No Return)
Once the tool confirms the connection, the system is ready to be entirely rewritten.
Action: Click the Start button in the MSMDownloadTool. The tool will begin the flashing process. It will show various stages: Erase, Download, and flashing partitions like System, Boot, and the crucial Modem/EFS partitions. DO NOT INTERRUPT THIS PROCESS. Do not touch the cable, and ensure your PC doesn’t lose power. The process usually takes 5 to 10 minutes. When it finishes, you will see a green text box saying “Download Complete” or “Flash Success.”
Step 6: Final Reboot and System Check
The final step is to let the device boot and verify the critical components.
Action: The phone will automatically reboot when the flash is complete. Disconnect the USB cable. The first boot is the longest”it can take a solid 10 minutes as the Android 11 firmware initializes all its services and rebuilds the Dalvik cache. Once booted, go immediately to the Dialer and type *#06# to verify your original IMEI number is present. Then, check the Settings for About Phone to confirm the Baseband version is known and not “unknown.”
Troubleshooting the EDL Flashing Process: Fixing Common Errors
Even the most careful process can hit snags. These errors often come from the low-level Qualcomm communication protocol.
Error 1: “Sahara Communication Failed”
The Problem: The communication handshake between the MSMDownloadTool and the phone’s Qualcomm boot ROM was interrupted. This is most often a cable issue, a timing failure in entering EDL mode, or a bad port selection.
The Fix:
- Use a different, known-good, short USB cable (preferably the original).
- Try a different USB port on your PC (preferably a USB 2.0 port, which is often more stable for this type of low-level flashing).
- Exit the tool, reboot your PC, and repeat Step 3 (entering EDL 9008 mode) very carefully, ensuring the Volume keys are held down until the tool recognizes the device.
Error 2: “Image does not match hardware”
The Problem: The stock ROM file you loaded into the MSMDownloadTool has a hardware identifier that doesn’t match the identifier of your phone’s processor. This usually happens when flashing a T-Mobile variant file onto a Global model, or vice-versa.
The Fix: Go back to the OnePlus stock ROM flash file download free list and be extremely certain you downloaded the file that matches your phone’s original region, not its current carrier.
Error 3: Device Shows “Unknown Device” or Disconnects After a Few Seconds
The Problem: The Qualcomm USB drivers are either not installed correctly or Windows is trying to load the wrong driver. Sometimes, the phone automatically exits EDL mode if the driver is wrong.
The Fix:
- Ensure you have disabled Windows Driver Signature Enforcement (a quick Google search for your Windows version will show you how).
- Uninstall all previously installed generic USB drivers from the Device Manager, then reinstall the specific OnePlus Qualcomm USB drivers. You must see Qualcomm HS-USB QDLoader 9008 under Ports (COM & LPT).
How to Flash Stock Firmware in EDL Mode by using MSM Download Tool? Step-by-step Video Guide:
Video Tutorial
Watch this guide for visual instructions
Uploaded: April 27, 2025
Frequently Asked Questions
What in the world is the MSMDownloadTool and why is everyone talking about it for OnePlus?
The MSMDownloadTool is the biggest lifesaver tool, full stop. It is a low-level flashing program made by the phone’s parent company, not some random hacker on the internet. You need it because it is the only thing that can communicate with your OnePlus phone when it is completely dead”what we call a hard brick. It bypasses the broken Android system, the bootloader, and everything else that is messed up, and talks directly to the Qualcomm chip inside the phone. Think of it as the secret factory reset button. It uses the phone’s lowest possible state, the Emergency Download Mode, to push a full, clean copy of the official OxygenOS back onto the device, making it new again. If you have a bricked phone, this tool is your last and best hope, and that is why you hear about it all the time when people talk about saving a dead OnePlus.
What is this “EDL Mode” or “Qualcomm 9008” mode everyone keeps mentioning?
EDL stands for Emergency Download Mode, and it is the key to unbricking. When your phone is so broken that it cannot even show the OnePlus logo, it is probably going into this hidden mode. On your Windows computer, this mode shows up as a simple device named Qualcomm HS-USB QDLoader 9008 under your Device Manager ports. When you see that 9008 port, you know your phone is ready to be saved because the hardware is still alive. This is the exact state where the MSMDownloadTool is waiting to talk to the phone. Getting the phone into this state usually means holding down both volume buttons (Up and Down) while you plug the USB cable into the computer, but the exact button trick can be different for some models. The most important thing is that the 9008 mode is the signal that the last resort rescue tool, the MSM Tool, can now do its job and send the file over.
Will using the MSM Tool wipe everything and do I lose my photos and files?
Yes. You need to understand this clearly: the MSMDownloadTool performs a full, complete, and total factory reset on your device. When you run this tool, it is not trying to save anything at all. It is wiping the entire storage chip clean and writing the official stock firmware onto it from scratch. Every single picture, every app, every contact, and every setting you had will be gone forever. This is the unavoidable price you pay for bringing a hard-bricked phone back to life. You have to accept the loss of data, because your phone was dead anyway and there was no other way in. The only good news is that after the tool finishes, your phone will boot up like it just came out of the factory box, and you can start totally fresh.
Does the MSMDownloadTool fix the bootloader, like, does it lock it back up?
Yes, it always does, and this is a major point to remember. If your phone was rooted or had a custom ROM, it means your bootloader was unlocked. When you use the powerful MSMDownloadTool, it flashes the official, factory-signed software image. Part of this entire factory process is forcing the bootloader to lock itself again. The whole point of the tool is to put the phone back into the exact, untouched state it was in when it was first manufactured, and all factory phones come with a locked bootloader. So, if you were unlocked before the brick, you will be locked again after you use this tool. You will have to go through the whole process of unlocking the bootloader again if you want to install custom ROMs or do any kind of deep tinkering after the unbrick is finished.

Author:
Abdul MalikMobile Software Expert and founder of GSM6.com. Specializes in FRP bypass, IMEI repair, and advanced mobile tools. All tutorials are tested on real devices for accuracy and safety.