• Abdul Malik (AM) • android • 1 min
Pixel 7 Pro Root with One-Click Root Tool on Android 15 | Step-by-Step Guide
Introduction: Google Pixel 7 Pro Root Guide
You are here because you demand complete control over your Google Pixel 7 Pro. You want to tear down the walls Google built and own every bit of the hardware you paid for. This guide is the blueprint for that takeover.
We are not using complicated command line chains that break if you miss one character. We are leveraging an All-in-One Tool”a raw, automated script and package that simplifies the most dangerous steps: bootloader unlocking and system image flashing. This method is engineered to be the most efficient and safest path to root on Android 15, directly flashing the patched images required for Magisk.
Important Disclaimer and Risk Assessment
Before your hands even touch the cable, you must face the facts. This is deep system modification, and it comes with real consequences.
Warranty Destruction: Rooting your Google Pixel 7 Pro will void your warranty. This action trips a flag that Google can see. Do not expect free repairs if you send a rooted device back.
The Bricking Risk: While this one-click tool minimizes mistakes, you are still flashing core system files. If your PC loses power, the cable is bumped, or you use the wrong file, you risk bricking your device”turning it into an unusable piece of plastic.
Security Sacrifice: An unlocked bootloader and root access mean you have sacrificed the core security chains. Banking apps, Google Pay, and other high-security applications will stop working until you use specialized modules to hide the root status. This is the trade-off for true system ownership.
Proceed only if you understand and accept these risks. This guide is for educational, technical purposes only. You are proceeding at your own, full risk.
Phase 1: Preparation “ Assembling the Tools and Checking the System
A successful root operation is 90% preparation. Do not skip or rush any step here.
1. Must Know Your Device: The Android 15 Lock
Your system version is the first check. This specific tool and its included files (boot.img, init_boot.img) are engineered to work with the core partition layout of the Google Pixel 7 Pro on Android 15.
- Action: Go to Settings > About phone > Android version. Confirm you are on Android 15. Mismatched versions can lead to immediate failure or a non-booting device.
2. The Hardware Foundation: PC and Data Backup
You need a solid environment for the root process to execute without interruption.
PC Environment: Ensure you have a stable Windows, Mac, or Linux computer. A laptop running on battery is safer than a desktop in case of a power flicker.
Drivers: You must have the correct low-level Android USB Drivers installed so your PC can communicate with the phone in Fastboot Mode.
- Prerequisite: A Windows/Mac/Linux PC with USB drivers installed “ Download Samsung Android USB Drivers (Note: Google’s official ADB/Fastboot drivers are often better for Pixel devices than generic drivers.)
Data Backup: The Inevitable Wipe: The very first step of this automated tool will be to Unlock the Bootloader. Unlocking the bootloader on any Google Pixel device MANDATORILY WIPES ALL DATA. This is a permanent, security-enforced feature.
- Action: BACK UP ALL YOUR PHOTOS, VIDEOS, AND CRITICAL FILES NOW. Use Google Drive, a dedicated PC transfer, or a physical external drive.
3. Download and Extract the All-in-One Tool Package
This package contains everything you need: the necessary patched images, the official Magisk application, and the automated script that handles the heavy lifting.
Download: Use the secure links provided to get the complete root package.
- Download From MegaSync: Pixel 7 Pro Root MegaSync
-… Magisk (Latest Stable Version) “ Magisk Latest Stable Version Download
Extraction: Extract the downloaded ZIP file into a simple, easy-to-access folder on your PC, like
C:\PixelRoot. Avoid using the default Downloads folder. You will need the password to open the file.- Password for the Tool Files:
gsm6.com
- Password for the Tool Files:
Phase 2: The Deep Dive “ Configuring the Pixel 7 Pro for Attack
You must manually open the communication ports on the phone before the tool can start working.
Step 1: Activate the Developer Console
The advanced settings we need are hidden by default.
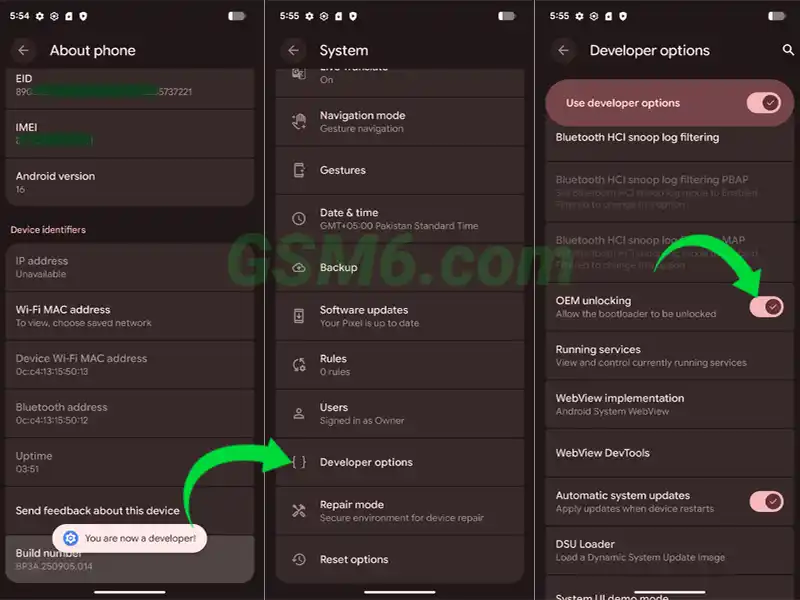
Action: Go to Settings > About Phone. Scroll all the way down.
Execution: Tap the Build Number seven (7) times quickly. A small message will confirm: “You are now a developer!”
Step 2: Enable the Two Critical Toggles
Now we enter the developer console to allow two things: communication with the PC and the bootloader command.
Action: Go back to Settings > System > Developer Options.
Execution (A) “ USB Debugging: Find Enable USB Debugging and switch the toggle ON. This allows the PC to send ADB commands to the phone when it is powered on.
Execution (B) “ OEM Unlocking: Find Enable OEM Unlocking and switch the toggle ON. This is the mandatory security gate that allows the device to respond to the bootloader unlock command. If this remains off, the entire process will fail at Step 7.
- Note: Your Pixel must be connected to the Internet for a few minutes for this toggle to enable. This is an anti-theft measure.

Step 3: Connect and Grant PC Permissions
Connect the phone to the PC now with a quality USB cable.
Action: Connect your Pixel 7 Pro with the data cable to your Windows PC.
Execution: When you connect, a pop-up window will appear on your phone screen: “Allow USB debugging?”
Critical Check: Check the box that says “Always allow from this computer” and then press ALLOW. This grants the PC persistent, unblocked access, which is crucial for the script to run seamlessly.
Phase 3: Automated Root Execution “ The One-Click Process
This is the main event. You are launching the automated script. From this point, the tool takes over the fastboot and flashing commands.
Step 4: Run the All-in-One Tool
Go to the folder where you extracted the tool files.
Action: Run the main executable file inside the extracted folder. It is usually a
.bat(Windows) or.sh(Linux/Mac) file, often named something likeroot-pixel7pro-android15.bat.Execution: The tool will launch a command prompt window and display the first instructions. It will automatically check for a connection and then start the process.
Step 5: Automatic Reboot into Bootloader
The tool uses ADB commands to switch the phone into the lowest-level programming mode.
Action: The tool will automatically reboot your phone using the command
adb reboot bootloader.Observation: Your phone screen will go black and then display the Fastboot Mode screen, often showing the status as DEVICE STATE - locked. The PC script will pause and wait.
![]()
Step 6: The Mandatory Bootloader Unlock
This is the moment of no return. The tool has sent the command, but the phone’s security requires your physical confirmation. This is the data wipe trigger.
Action: Look at your Pixel 7 Pro screen. It will display a huge warning about data loss and security, asking you to confirm the unlock. The command is
fastboot flashing unlock.Execution on Phone: Use the Volume Up/Volume Down keys to navigate the options until “Unlock the bootloader” (or the equivalent confirmation option) is highlighted. Then, press the Power Button to select it.
Result: The phone immediately performs a factory data reset and then automatically reboots back into Fastboot Mode, but this time, the device state will show as DEVICE STATE - unlocked.
![]()
Step 7: The Automated Flashing of Patched Images
With the bootloader now wide open, the tool can inject the custom code needed for root access.
Action: The tool will automatically begin a series of fastboot commands.
Technical Breakdown:
It flashes the custom-patched
boot.imgfile. This image contains the kernel and instructions that load the operating system, and it has been modified to allow the root shell to execute.It flashes the patched
init_boot.img(on newer Android versions, this is often the partition that stores core boot configuration).
Observation: You will see multiple lines in the command prompt that read:
(bootloader) Flashing...or(bootloader) Writing 'boot'...and(bootloader) Writing 'init_boot'...Important: You have no need to do anything on the tool; its all automated script. The script handles the file paths and the specific
fastboot flashcommands necessary.
Step 8: Final Reboot into Recovery for Wipe
The tool completes its job of flashing the necessary files and prepares the phone for a clean boot.
Action: After the patched images are flashed, the tool will command the phone to reboot into Recovery Mode. The command window will close automatically.
Observation: The phone will reboot, and you will see the black screen with the Android mascot lying down, displaying the “No command” error.
Step 9: Activating Recovery Mode Interface
The “No command” screen is not an error; it’s a security guard waiting for the secret input.
Action: You need to press a quick combination of keys to reveal the standard Recovery menu.
Execution: Press and hold the Power Button, and while holding it, press the Volume Up button once and then release both keys immediately. This will reveal the list of Recovery Mode options.
Step 10: The Mandatory Factory Reset (Cleanup)
Even though the bootloader unlock already wiped your data, the system needs a clean slate to initialize the new, custom boot image correctly.
Action: In the Recovery Mode menu, use the Volume Keys to navigate.
Execution: Select “Wipe data / factory reset” and press the Power Button to confirm. Then confirm the operation on the next screen. This finalizes the data wipe and clears any lingering security traces.
Step 11: Final Reboot to Normal System
The system is clean, the bootloader is open, and the root files are in place.
Action: In the Recovery Mode menu, select “Reboot system now.”
Observation: The phone will reboot to normal mode. It will take several minutes of loading time on the Google logo before you reach the setup wizard. This is normal, as the phone is building the entire
/datapartition and cache structure from scratch.
Phase 4: Post-Root System Initialization and Verification
The phone is now running a patched system, but the root management app is missing.
Step 12: Initial System Setup
Go through the initial setup process just like a new phone. Skip the fingerprint setup and restore options for now.
Action: Complete the setup wizard until you reach the home screen and can access the app drawer.
Observation: Once on the home screen, open the app drawer. You will see a new application shortcut named Magisk. This is the core root management application that was installed by the patched boot image.
Step 13: Installing the Magisk App and Finalizing Root
The shortcut is the last step. It pulls the necessary files from the internet and finalizes the root environment.
Action: Connect your phone to the Internet (Wi-Fi or mobile data).
Execution: Tap on the Magisk shortcut. The app will launch, ask for permission, and automatically install the full Magisk application.
Confirmation: Open the Magisk app. The interface will show SuperUser button enabled, and it will confirm the installation is complete. This means your Google Pixel 7 Pro on Android 15 has been successfully rooted, and you now have full root access.
Step 14: Verify Root Access (Final Check)
Always confirm the root status with a third-party app.
Action: Go to the Google Play Store and install any popular Root Checker application.
Execution: Launch the Root Checker app. It will immediately ask for Superuser permission. Tap Grant or Allow.
Final Result: The app will confirm that you have correctly installed root access on your Pixel 7 Pro Android 15.
The Payoff: Benefits and Risks of Rooting Your Pixel 7 Pro in 2025
You have successfully executed a dangerous technical procedure. So, what is the reward, and what are the lingering risks you must manage?
The Power: Benefits of Rooting Pixel 7 Pro
Root access unlocks a world of system control and customization that stock Android aggressively blocks.
| Benefit | Description |
|---|---|
| Complete System Customization | You can use modules and applications to change every visual element, system sound, and animation on the phone, well beyond what themes allow. |
| Bloatware Elimination | System applications installed by the carrier or Google that you cannot normally uninstall can now be permanently removed, freeing up storage and resources. |
| Advanced System Tweaks | You gain access to apps that can alter the CPU governor, modify memory management, and fine-tune power limits to improve performance or significantly increase battery life. |
| Custom ROM Installation | Root is the first critical step needed to move to a completely different, customized operating system like LineageOS or GrapheneOS. The Google Pixel 7 Pro Root Android 15 method is the gateway to this. |
| Full Backup and Restore | You can use tools to create a complete, raw image backup of your entire system, including app data, allowing you to restore your phone to a previous state instantly. |
The Risks: Consequences of an Unlocked System
Rooting is not without its continuous costs. You must manage these risks daily.
Continuous Security Issues: Your device fails the fundamental security check. You must install complex Magisk modules (like MagiskHide or other Play Integrity solutions) to try and trick financial apps into working. This is a constant battle against Google’s evolving security checks.
Voided Warranty: As stated, the flag is tripped. If you have a hardware issue, be prepared to pay for the repair out of pocket.
Potential Instability: Flashing custom files, installing incompatible modules, or editing system files can lead to random crashes, reboots, or stability issues that are difficult to troubleshoot.
The Pixel 7 Pro Root Android 15 process is complete. You have successfully unlocked advanced features and customized your device. This automated approach, using the precise files and steps, ensures that the most complicated commands are handled safely, giving you a hassle-free transition to a rooted system.
For a step-by-step visual guide, check out the video:
Video Tutorial
Watch this guide for visual instructions
Uploaded: February 23, 2025
Root Tool Specifications
| Specification | Details |
|---|---|
| Tool Name | Pixel 7 Pro Android 15 One-Click Root Tool |
| Version | 2025.02 Edition |
| Platform | Windows, macOS, Linux |
| File Size | ~850 MB |
| Password | gsm6.com |
| Included Files | Patched boot.img, init_boot.img, Magisk APK, ADB/Fastboot |
| Requirements | Android USB Drivers, USB Type-C Cable |
| Data Wipe | Required (Bootloader Unlock) |
Download Links
| Source | Link | Size | Password |
|---|---|---|---|
| MegaSync | Direct Download | ~50MB | gsm6.com |
Note: This tool is specifically for Google Pixel 7 Pro running Android 15. Do not use on other devices or Android versions.
Frequently Asked Questions
Will this “one-click” tool really void my Google Pixel 7 Pro warranty?
Yes, absolutely. The moment you use the tool to run the fastboot flashing unlock command, you trip a physical security fuse. Google’s systems log that your bootloader state is changed to “unlocked.” This automatically voids your manufacturer warranty for the device. Do not expect free service if you send it in after this step.
Is using a one-click tool safe, or will it brick my Pixel 7 Pro?
This tool simplifies a dangerous process, but it does not remove the risk. The tool is designed to be safer because it handles the complicated fastboot command lines for you, reducing human error. However, the risk of a “brick” (an unusable phone) remains if you: Use the wrong Android 15 file version. Disconnect the cable during the flashing process (Step 7). Have corrupted files or a bad USB driver setup.
Can I unroot my Pixel 7 Pro after following this guide?
Yes, you can. Unrooting involves flashing the official, untouched stock factory image firmware from Google back onto your phone. This process completely overwrites the patched boot files and removes all traces of Magisk. Note: This process does not automatically re-lock the bootloader; you must do that separately using the fastboot flashing lock command, which will trigger a final data wipe.
What are the main benefits of rooting the Pixel 7 Pro on Android 15?
The benefits boil down to total control. You gain the ability to: Remove System Bloatware (apps you can’t normally uninstall). Run Firewall/Ad-Blockers (system-wide ad-blocking with no VPN needed). Install Custom ROMs (like GrapheneOS or LineageOS, which require an unlocked bootloader). Bypass Restrictions (like getting unlimited, full-resolution Google Photos storage using Magisk modules).
Will my banking apps and Google Pay still work after rooting with Magisk?
Not out of the box. Simply rooting will cause your Pixel to fail the Google Play Integrity API check (the modern version of SafetyNet). All secure apps (banking, payment, Netflix, etc.) will stop working. You must immediately install specific, advanced Magisk modules after rooting to “hide” your root status and spoof your device security state. This is an extra step and a constant battle against new Google security patches.

Author:
Abdul MalikMobile Software Expert and founder of GSM6.com. Specializes in FRP bypass, IMEI repair, and advanced mobile tools. All tutorials are tested on real devices for accuracy and safety.