• Abdul Malik (AM) • android • 1 min
Google Pixel 6 series IMEI Repair Android 16 - Fix imei 0000
Restoring IMEI on Google Pixel 6, 6a, and 6 Pro After Android 16 Update: A Comprehensive Guide
Are you one of the Google Pixel 6 series users experiencing the dreaded “000000000000000” IMEI issue after updating your device to Android 16? You’re not alone, and fortunately, there’s a proven solution. This in-depth guide provides a complete, step-by-step methodology for effectively restoring the missing IMEI on your Google Pixel 6, Pixel 6a, or Pixel 6 Pro running Android 16.
Our method meticulously walks you through each critical stage, from unlocking your device’s bootloader to strategically modifying the devinfo.img and, if necessary, downgrading your radio image. This process has undergone rigorous testing on multiple devices and has demonstrated a 100% success rate when all instructions are followed precisely. All indispensable tools and drivers required for this repair are conveniently provided at the conclusion of this article.
![]()
Disclaimer: Pixel 6 series IMEI Repair Android 16
This guide is intended strictly for educational and informational purposes. Please be aware that IMEI repair or modification may be subject to legal restrictions in certain jurisdictions. It is imperative that you utilize this tutorial only if you are the legitimate owner of the device and your sole objective is to restore the original IMEI that was factory-assigned to your phone. We explicitly disclaim all responsibility for any unauthorized or illegal misuse of this guide, or for any potential damage incurred to your device during the process. Proceed at your own risk.
Supported Devices: Pixel 6 series IMEI Repair Android 16
Google Pixel 6 (codenamed:
oriole)Google Pixel 6a (codenamed:
bluejay)Google Pixel 6 Pro (codenamed:
raven)
Prerequisites:
A Windows PC or laptop.
A high-quality USB-C cable for reliable connection.
A stable internet connection.
Your device’s original IMEI number (typically found on the retail packaging, the SIM tray, or by dialing
*#06#on a working device).A basic understanding of using ADB (Android Debug Bridge) and Fastboot commands.
Step-by-Step IMEI Restoration Process
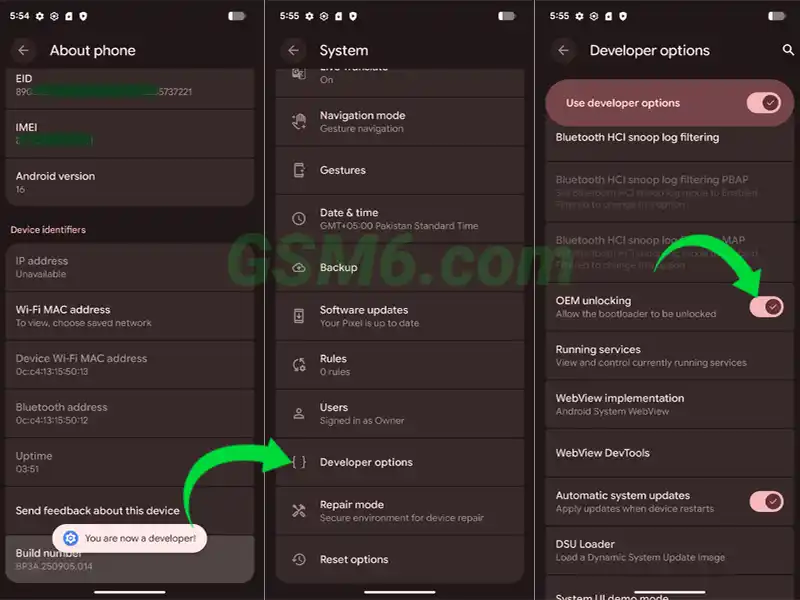
Step 1: Prepare Your Device “ Enable Developer Options, OEM Unlocking, and USB Debugging
Before you can interact with your Pixel device at a deeper level, you need to enable specific developer settings:
Navigate to your phone’s Settings app.
Scroll down and tap on About phone.
Locate the Build number entry and tap on it rapidly seven times. A toast message will appear, indicating “You are now a developer!”
Go back to the main Settings menu.
Tap on System, then select Developer Options.
Within Developer Options, ensure that OEM Unlocking is toggled ON. This is crucial for unlocking the bootloader.
Also, enable USB Debugging. This allows your computer to send commands to your phone via ADB.
This step is fundamental for establishing communication between your PC and your Pixel device using ADB and Fastboot protocols.

Step 2: Set Up Your PC “ Download and Extract Android Platform Tools
The Android Platform Tools package contains essential utilities like ADB and Fastboot, which are indispensable for this process.
Download the latest Android Platform Tools from here
Once downloaded, extract the contents of the ZIP file to an easily accessible folder on your computer, for instance,
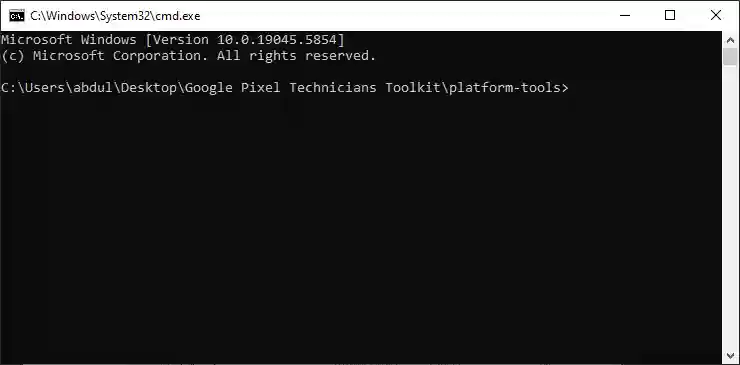
C:\platform-tools.Open the extracted
platform-toolsfolder. Hold down theShiftkey on your keyboard, then right-click anywhere within the folder’s empty space. From the context menu, select “Open command window here” or “Open PowerShell window here” (the option may vary based on your Windows version). This will open a command prompt or PowerShell window directly in theplatform-toolsdirectory.
Step 3: Establish ADB Connection and Authorize Debugging
Now, let’s confirm your computer can communicate with your phone:
Connect your Google Pixel phone to your PC using a reliable USB-C cable.
In the command window you opened in Step 2, type the following commands, pressing
Enterafter each Command:adb kill-serveradb devicesImmediately after typing
adb devices, look at your phone’s screen. You should see a prompt asking to “Allow USB debugging.” Tap Allow or Always allow from this computer for future convenience.Check the command window again. If your device’s serial number is listed under “List of devices attached,” your ADB connection is successfully established.
Step 4: Unlock the Bootloader
Unlocking the bootloader is a critical step that allows you to flash custom images and modify system partitions. WARNING: This action will factory reset your device and erase all data. Back up any important information before proceeding.
With your phone still connected and USB Debugging enabled, type the following command in the command window to reboot your device into bootloader mode:
adb reboot bootloaderOnce your phone is in bootloader mode, type the following command to initiate the bootloader unlock process:
fastboot flashing unlockLook at your phone’s screen again. You will see a confirmation prompt. Use the Volume keys to navigate and select Unlock the bootloader, then press the Power button to confirm your selection.
Your device will now proceed to unlock the bootloader and perform a factory reset. It will then reboot automatically.
Note: Your device will now boot up with an unlocked bootloader. You might see a warning message on startup indicating this.
![]()
Step 5: Perform a Data Wipe from Recovery (Optional but Recommended)
While unlocking the bootloader performs a wipe, an additional wipe from recovery ensures no residual data interferes with the repair process.
After your device has rebooted from the bootloader unlock, ensure USB Debugging is re-enabled if it was turned off.
In the command window, type:
fastboot reboot recoveryOnce your phone boots into the Android Recovery menu, use the Volume buttons to navigate to Wipe data/factory reset.
Press the Power button to select it. Confirm the action when prompted.
After the wipe is complete, select Reboot system now.
Step 6: Temporarily Disable Antivirus/Windows Defender
The IMEI repair tool you are about to use modifies system files, which can sometimes be flagged as a false positive by antivirus software or Windows Defender. To prevent interference:
- Before downloading or extracting the “Pixel 6 Network Fix Tool,” temporarily disable your antivirus software or Windows Defender. Remember to re-enable it after completing the repair process.
Step 7: Download and Extract the Pixel 6 Network Fix Tool
This specialized tool is crucial for generating the modified devinfo.img file.
Download the Pixel 6 Series Network Fix Tool from the provided link: Download From Here
Extract the contents of the downloaded ZIP file to a new, easily accessible folder on your desktop (e.g., “PixelFixTool”).
Navigate to the extracted folder. Right-click on the tool’s executable file (it might have an
.exeextension) and select Run as administrator.
Step 8: Select Device Mode and Replace IMEI Using the Tool
Now, use the Network Fix Tool to prepare the necessary devinfo.img.
The Network Fix Tool interface will appear.
From the provided list, carefully select your specific device model: Pixel 6, 6a, or 6 Pro.
In the designated field, accurately enter your original IMEI number. Double-check for any typos. This IMEI should match the one found on your phone’s box or SIM tray.
Click the Replace IMEI button.
The tool will process your input and generate a modified
devinfo.imgfile. This file will typically be saved within a subfolder specific to your device model inside the tool’s extracted directory. Make note of its location.
![]()
Step 9: Reboot to Bootloader Again
To flash the newly generated devinfo.img, your phone needs to be in bootloader mode once more.
Ensure USB Debugging is re-enabled on your phone if it turned off after the previous reboots.
Connect your phone to your PC via USB.
In your command window (the one opened in Step 2), type:
adb reboot bootloader
Step 10: Flash the Modified devinfo.img
This step injects the corrected IMEI information into your device’s system.
In your command window, navigate to the directory where the modified
devinfo.imgfile was saved by the Network Fix Tool (from Step 8). You can use thecdcommand (e.g.,cd C:\PixelFixTool\Pixel6Proif the file is in a subfolder). Alternatively, you can drag and drop thedevinfo.imgfile into the command window after typingfastboot flash devinfo(note the space at the end) to automatically get its full path.Execute the following command, replacing
devinfo.imgwith the actual path if you didn’t navigate to the directory:fastboot flash devinfo devinfo.imgAfter the flashing process completes successfully, reboot your device:
fastboot rebootOnce your phone has fully booted, open the dialer app and dial
*#06#. Your original IMEI should now be displayed correctly. If it is, congratulations, your repair is successful!
Step 11: Contingency Plan “ If IMEI Still Shows 000000000000000
In some rare instances, despite flashing the modified devinfo.img, the IMEI might still not appear correctly. This usually indicates that the Android 16 radio firmware is actively interfering with or blocking the devinfo modifications. In such a scenario, a temporary downgrade of the radio image is necessary.
Step 12: Download Android 15 Firmware (Specifically for Radio Image)
You only need the radio.img from an Android 15 factory image.
Navigate to the official Google Developers website for factory images:
https://developers.google.com/android/imagesScroll down and locate your specific device model (Pixel 6, 6a, or 6 Pro).
Find and download the last stable Android 15 factory image for your device. It’s crucial to select an Android 15 version.
Once the factory image ZIP file is downloaded, extract its contents to a new folder on your PC. Within this extracted folder, locate the
radio.imgfile. It will typically be in the main extracted directory or within a subfolder likeimages.
Step 13: Flash the Android 15 Radio Image
This step will temporarily downgrade your device’s radio firmware to an Android 15 version, allowing the devinfo modification to take effect.
Connect your phone to your PC and reboot it into bootloader mode again:
adb reboot bootloaderIn your command window, use the following command to flash the extracted Android 15/16
radio.img. Ensure you provide the full path to theradio.imgfile if it’s not in your current command window directory:fastboot flash radio C:\Path\To\Your\radio.img(ReplaceC:\Path\To\Your\radio.imgwith the actual path to theradio.imgfile you extracted in Step 12).After the radio image has been successfully flashed, reboot your phone:
fastboot rebootOnce your device fully boots, open the dialer and dial
*#06#. Your IMEI should now be correctly restored and displayed.
Note: After successfully restoring the IMEI with the Android 15 radio, you may eventually be able to update your radio firmware back to Android 16 via a future OTA update or by manually flashing only the Android 16 radio.img from a new factory image. However, verify the IMEI remains stable before doing so.
Final Result: Pixel 6 series IMEI Repair Android 16
Upon successful completion of these steps, your Google Pixel 6, 6a, or 6 Pro should now exhibit the following:
Normal booting sequence without issues.
The correct original IMEI displayed when dialing
*#06#.Full restoration of network connectivity, allowing calls, texts, and mobile data usage.
Essential Downloads:
Pixel 6 Network Fix Tool Specifications
| Specification | Details |
|---|---|
| Tool Name | Pixel 6 Series Network Fix Tool |
| Version | 1.0 |
| Platform | Windows 7/8/10/11 |
| File Size | ~50 MB |
| License | Freeware |
| Price | Completely Free |
| Supported Models | Pixel 6, Pixel 6a, Pixel 6 Pro |
| Functions | IMEI Restoration, devinfo.img Generation |
| Requirements | Unlocked Bootloader, ADB/Fastboot |
Required Tools Table
| Tool | Purpose | Download Link |
|---|---|---|
| Android Platform Tools | ADB and Fastboot commands | Download Here |
| Google USB Drivers | Device detection on Windows | Download Here |
| Pixel 6 Network Fix Tool | Generate modified devinfo.img | Download Here |
| Factory Images | For radio.img downgrade | Google Developers |
Process Summary
| Step | Action | Time Required | Data Loss |
|---|---|---|---|
| 1-3 | Setup & Connection | 5 minutes | No |
| 4 | Unlock Bootloader | 2 minutes | Yes (Full Wipe) |
| 5 | Data Wipe (Optional) | 2 minutes | Yes |
| 6-10 | IMEI Repair | 10 minutes | No |
| 11-13 | Radio Downgrade | 5 minutes | No |
Step by step Video Guide:
Video Tutorial
Watch this guide for visual instructions
Uploaded: July 25, 2025
Troubleshooting Common Issues:
Phone not detected by ADB/Fastboot:
- Ensure the USB cable is securely connected and not faulty.
- Try a different USB port on your PC.
- Reinstall the Google USB Driver (linked above).
- Verify USB Debugging is enabled on your phone.
fastbootcommands not working or device showing<waiting for device>:- Confirm your phone is truly in bootloader mode.
- Ensure the
platform-toolsfolder is correctly added to your system’s PATH, or that your command window is opened directly in theplatform-toolsdirectory. - Check for driver issues in Device Manager (Windows).
IMEI still missing or incorrect after all steps:
- Double-check that you entered the original IMEI correctly into the Network Fix Tool.
- Ensure you selected the correct device model in the tool.
- Verify that you flashed the modified
devinfo.imgand, if necessary, the Android 15radio.imgwithout errors. - Try a slightly older or different Android 15 radio image if one is available for your device model.
Conclusion:
The predicament of a missing IMEI on Google Pixel 6 series devices after an Android 16 update is a resolvable issue. By diligently following this comprehensive, step-by-step guide, which involves unlocking the bootloader, utilizing a custom devinfo.img, and potentially downgrading the radio firmware to Android 15, you can successfully restore your device’s functionality. Precision and careful execution of each step are paramount for a successful repair.
We hope this guide has proven invaluable in resolving your IMEI issue. For a visual aid and further clarification, we highly recommend checking out our full video tutorial available on YouTube.
Stay connected with GSM6.com for more cutting-edge repair solutions, tools, and technical insights.
Frequently Asked Questions
Why did my Google Pixel 6 series phone lose its IMEI after updating to Android 16?
While the exact technical reason isn’t always publicly detailed by Google, users have reported that certain Android 16 updates can sometimes corrupt or interfere with the device’s IMEI data partition (often related to the devinfo.img or radio firmware), leading to the “000000000000000” display and loss of network connectivity. This guide provides a proven method to restore it.
Is IMEI repair legal?
The legality of IMEI repair or modification varies significantly by country and region. This guide is strictly for educational purposes and should only be used by the original device owner to restore the original, legitimate IMEI that came with their phone. Modifying an IMEI for fraudulent purposes is illegal in most places. Always consult your local laws.
Will unlocking the bootloader void my warranty?
Yes, unlocking the bootloader on your Google Pixel device will almost certainly void its manufacturer’s warranty. Additionally, this process will wipe all data from your phone. Proceed with caution and understand these implications.
Do I need a specific Android 15 firmware version for the radio downgrade?
Yes, you need to download the last stable Android 15 factory image specifically for your Pixel 6, 6a, or 6 Pro model from the official Google Developers website. You only need to extract the radio.img file from this package. Using a different version might lead to compatibility issues.
What if my computer doesn’t detect my Pixel phone during the process?
First, ensure USB Debugging is enabled on your phone. Try a different USB cable and a different USB port on your PC. You may also need to reinstall the Google USB Driver (linked in the Downloads section of the article) to ensure your computer properly recognizes the device in ADB and Fastboot modes.
Can I re-lock my bootloader or Update firmware after fixing the IMEI?
Yes! You can re-lock the bootloader after fixing the IMEI if desired. However, re-locking will perform another factory reset. Regarding updates, you can install firmware updates, but if an update includes a new radio that causes the IMEI issue to return, you may need to repeat the radio downgrade step.
Will I lose my data during this process?
Yes, unlocking the bootloader (Step 4) and re-locking it (if you choose to do so later) will both perform a factory reset, erasing all data on your device. It is crucial to back up all important data before starting this guide.
My IMEI is fixed, but can I update to Android 16 again or keep the Android 15 radio?
Once your IMEI is fixed, you can typically remain on the Android 15 radio without issues. You might receive OTA updates for Android 16, which would re-update your radio. If you wish to update to the latest Android 16 radio, you can try flashing just the radio.img from an Android 16 factory image after confirming your IMEI is stable. However, be prepared to repeat the radio downgrade if the IMEI issue re-appears. Many users prefer to stick with a known working configuration.

Author:
Abdul MalikMobile Software Expert and founder of GSM6.com. Specializes in FRP bypass, IMEI repair, and advanced mobile tools. All tutorials are tested on real devices for accuracy and safety.