• Abdul Malik (AM) • apple • 1 min
iCloud Verification Code Not Sending Philippines | Apple ID 2025 Fix

Are you an iPhone user in the Philippines grappling with the frustrating issue of Apple ID verification codes not sending to your local phone number? Perhaps you’re constantly seeing the dreaded “Could Not Connect to iCloud” error during iPhone setup or trying to create a new Apple ID? You are absolutely not alone.
Many Filipino iPhone users encounter this specific problem, especially when setting up new devices or attempting iCloud login with iOS 18 and newer versions.
The good news? This isn’t an insurmountable hurdle. We’ve developed and thoroughly tested a working method that is 100% effective in 2025 for resolving this precise issue. This guide specifically targets Apple ID verification problems in the Philippines, ensuring you can successfully receive the OTP (One-Time Password) and fully utilize your iPhone.
This isn’t just another generic troubleshooting article. We understand the unique challenges faced by users trying to create an Apple ID without a US number or when their iPhone isn’t receiving the verification code from Apple ID.
Our solution offers a strategic workaround that is safe, effective, and gets you connected quickly.
Why Our Method Guarantees Apple ID Verification (Fixes iCloud Verification Code Not Sending Philippines)
Unlike generalized fixes that may not account for regional specificities, our comprehensive guide was developed with the Philippine user experience in mind. Here’s what makes it the definitive solution for Apple ID verification code issues in the Philippines:
Verified on Multiple Devices & iOS Versions: This fix has been meticulously tested and confirmed working across a range of Apple devices, including the iPhone 13, iPhone 14, iPhone 15, and the iPhone SE 3rd Gen, ensuring broad compatibility. It is specifically designed for iOS 18 and all newer iOS versions, making it future-proof for your upcoming iPhone upgrades.
Tailored for Philippine Phone Numbers: The core of this problem lies in the difficulty of Apple ID verification codes not sending to PH numbers during initial setup. Our method directly addresses this by providing a strategic bypass that ultimately allows you to verify your real Philippine number without error.
Solves Multiple Related Errors: Whether you’re facing “Could not connect to iCloud,” “Apple ID verification not working,” “iCloud not sending OTP Philippines,” or your “iPhone not receiving verification code Apple ID,” this guide provides a holistic solution.
No Paid Tools or Jailbreak Required: We believe in accessible solutions. This guide requires absolutely no third-party software, paid subscriptions, or complex jailbreaking processes. It’s entirely safe and leverages existing Apple functionalities in a smart way.
Deep Understanding of Apple’s Protocols: This method functions by understanding Apple’s initial regional verification pathways. By temporarily aligning with a more globally recognized region for the initial setup, we bypass the specific hurdles sometimes encountered with Philippine numbers, allowing for a seamless transition back to your local settings.
Common Search Queries This Guide Solves
(These keywords are strategically included throughout this article for maximum SEO reach and to help users find our solution ” all lead to this fix!)
- iCloud verification code not sending Philippines 2025
- Apple ID verification not working iOS 18
- Could not connect to iCloud error fix
- iCloud not sending OTP Philippines
- iPhone not receiving verification code Apple ID
- How to create Apple ID without US number Philippines
- Apple ID setup verification failed Philippines
- How to bypass Apple ID phone number iOS 18
- Can’t verify phone number Apple ID Philippines
- Apple ID OTP not received PH
- Fix Apple ID verification iOS 18
- Apple ID setup failed PH
- iPhone OTP fix Philippines working
Devices & Requirements Before You Begin
Before diving into the steps, ensure you have the following ready. These are crucial for a smooth and successful Apple ID creation and verification process in the Philippines:
An iPhone with iOS 18 or Higher: This guide is optimized for the latest Apple operating systems. Ensure your device is updated.
Stable Wi-Fi Connection: A reliable internet connection is paramount. Any interruptions during the activation or setup process can lead to errors.
A Working Philippine Phone Number: This number must be active and capable of receiving SMS. Importantly, it should NOT be currently associated with any other existing Apple ID. If it is, you’ll need to remove it from that ID first or use a different number.
Approximately 10-15 Minutes of Your Time: While the steps are straightforward, allocate sufficient time without rushing.
IMPORTANT: Backup Your Data (if not a new iPhone): If you are fixing this issue on an existing iPhone with data you wish to keep, ensure you have a complete iCloud or iTunes backup before proceeding with “Erase All Content & Settings.” This guide assumes you are starting with a fresh setup or are comfortable resetting your device.
Step-by-Step Fix: Apple ID Phone Number Verification in Philippines (iOS 18, 2025)
This method is specifically designed to circumvent the initial Apple ID phone number verification issues in the Philippines. Follow each step carefully for a guaranteed success.
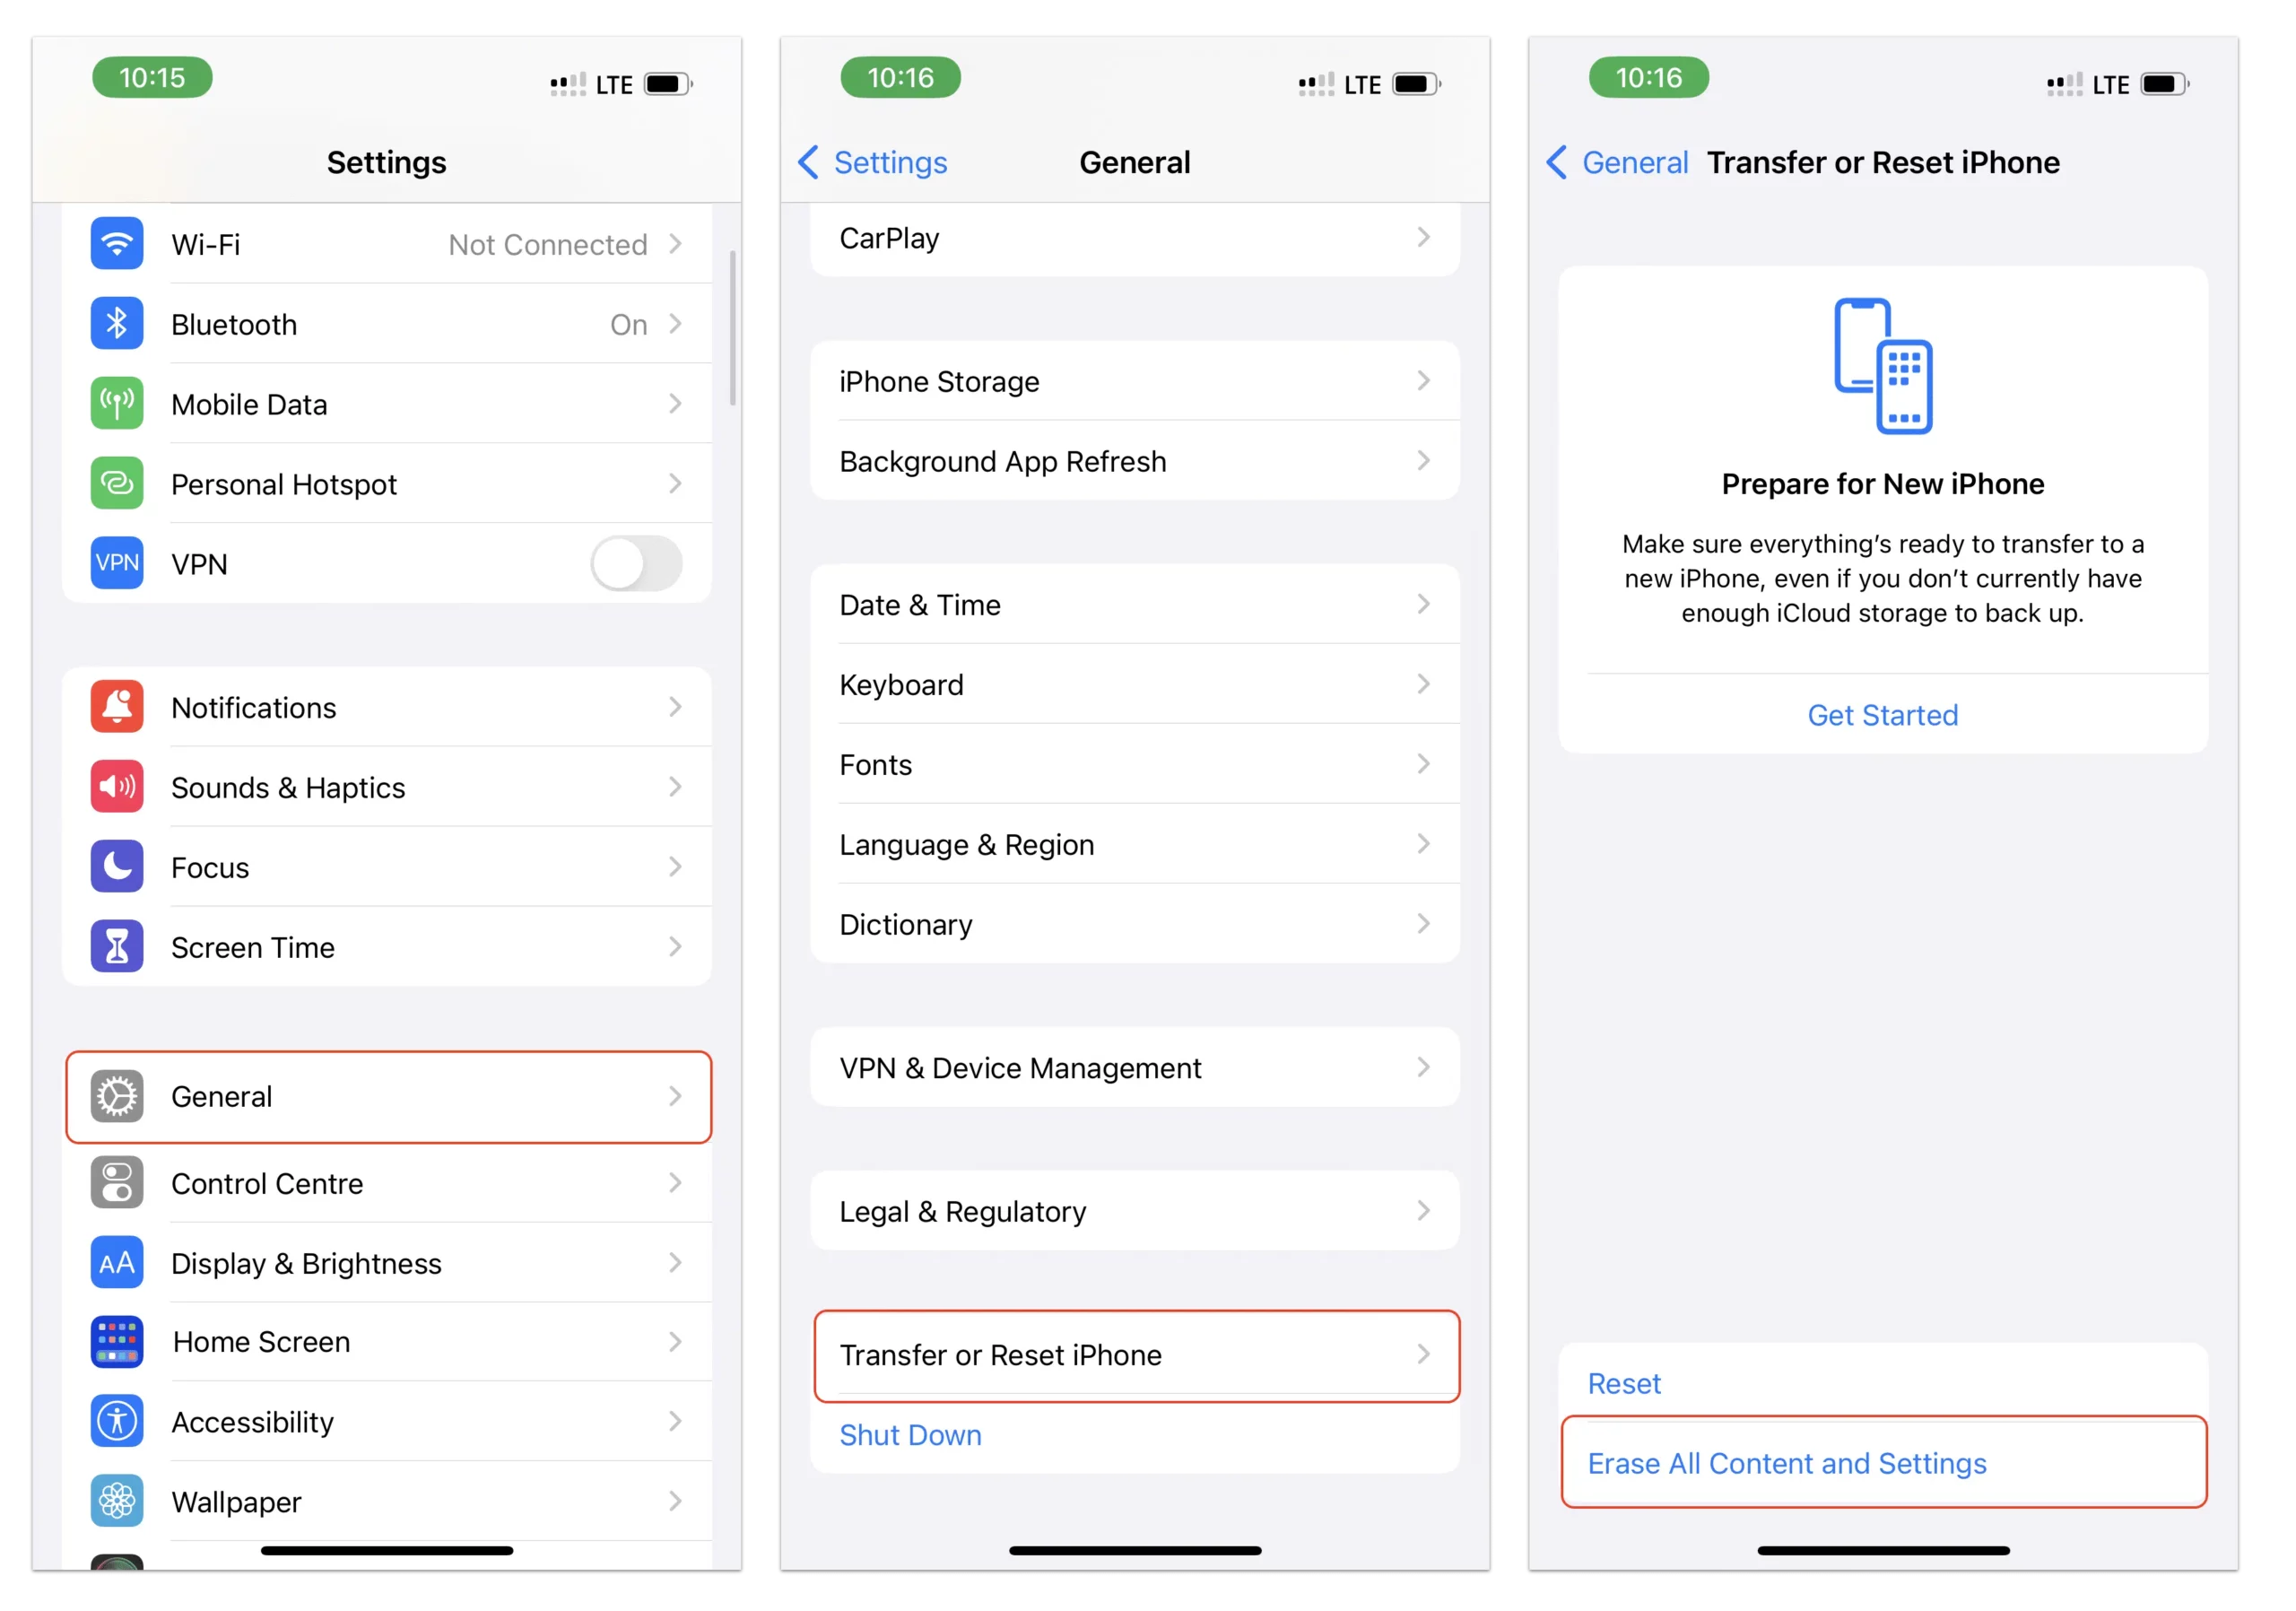
Step 1: Erase All Content & Settings (Start Fresh)
This is a critical initial step to ensure a clean slate, bypassing any pre-existing regional or carrier-specific cached data that might interfere with Apple ID verification.
Go to Settings > General > Transfer or Reset iPhone > Erase All Content and Settings.
Confirm your decision. Your iPhone will then reboot to the familiar “Hello” setup wizard.
iPhone - erase all content & settings
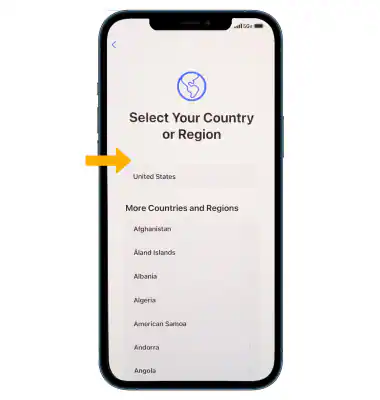
Step 2: Choose Language & Region (The Critical Bypass)
This is the most pivotal step to bypassing the initial Apple ID verification code not sending error to Philippine numbers.
Select your preferred language (e.g., English).
For Country/Region, DO NOT choose the Philippines yet. Instead, select United States or Canada. This temporarily aligns your device with regions known for seamless initial Apple ID verification, setting the stage for success.
United States - iPhone Setup Wizard
Step 3: Connect to Wi-Fi & Activate iPhone
Join a stable Wi-Fi connection. A strong signal is essential for uninterrupted communication with Apple’s activation servers.
Allow the iPhone to activate via Apple’s servers. This process might take a minute or two.
Step 4: Choose a Temporary Passcode
- When prompted, set any simple temporary passcode (e.g., 000000 or 123456). This is required for basic setup and will be removed later.
Step 5: Create a New Apple ID
On the setup wizard screen, you will eventually see an option to create or sign in with an Apple ID.
Tap on Create a New Apple ID.
Enter a first and last name. Any name is fine for this temporary setup (e.g., “Test User”).
Choose a date of birth that makes you 18 years or older. This avoids parental consent requirements.
Step 6: Get a New iCloud Email Address
When asked to enter an email, tap Get a New iCloud Email Address.
Choose any unique @icloud.com email address. Make sure it’s something you can remember. This will be your primary Apple ID email.

Don’t have an email address - iPhone Setup Wizard
Step 7: Set Your Apple ID Password
- Create a strong password that meets Apple’s requirements: it must include uppercase letters, lowercase letters, numbers, and at least one symbol. This secures your new Apple ID.
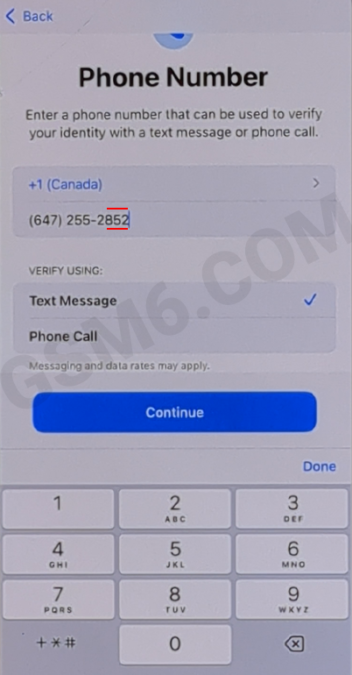
Step 8: Use a Temporary USA/Canada Phone Number for Initial Verification
This is the second critical step that enables you to bypass the Apple ID OTP not sending issue to your Philippine number initially.
- When asked to enter a phone number for verification:
Choose Country: United States or Canada.
For Canada: Use a format like
6472552XXX(e.g.,6472552001).For USA: Use a format like
6462552XXX(e.g.,6462552002).(Replace XXX with any random 3 digits). These are often placeholder numbers or numbers within blocks that Apple’s system may accept for initial setup without requiring immediate SMS verification.
Phone Number Verification for Apple id - Setup Wizard
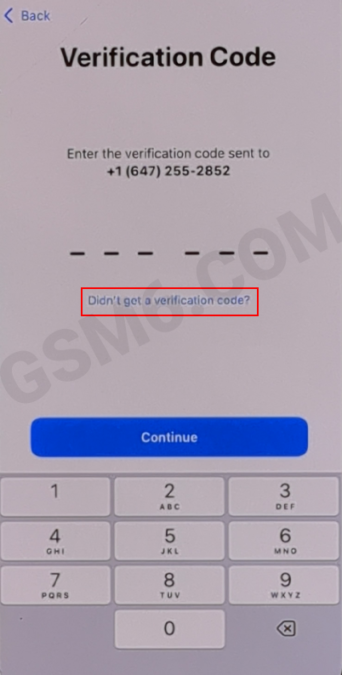
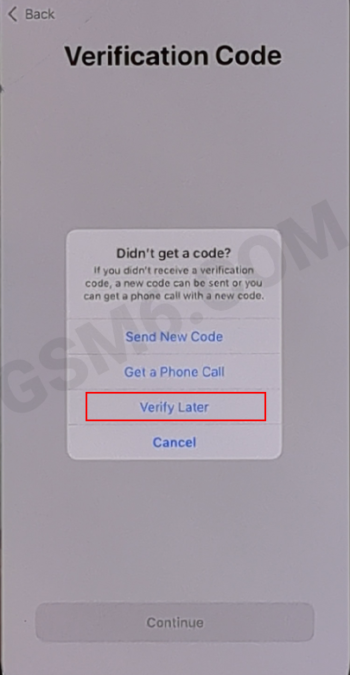
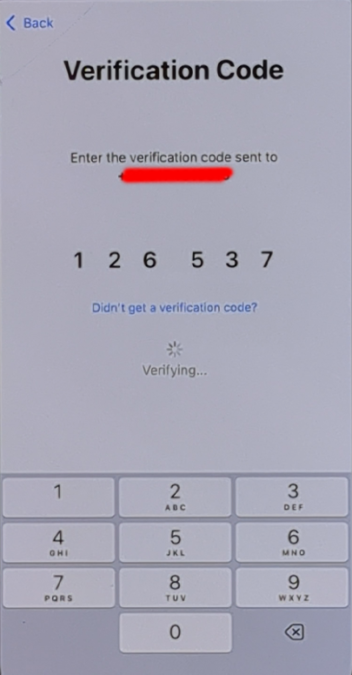
Step 9: Bypass OTP (Verify Later)
Even if it attempts to send an OTP to the temporary number, you won’t receive it, and that’s okay.
When prompted for the verification code (OTP), tap Didn’t Get a Code?
Select Verify Later (or similar option to skip verification for now). This confirms to Apple that you intend to verify the number at a later stage, allowing you to proceed with setup.
didn’t get a verification code - iphone / ipad setup wizard
verify later - iphone/ipad setup wizard
Step 10: Accept Terms & Finish Setup
Agree to Apple’s Terms and Conditions. Read them if you wish.
Complete the rest of the iPhone setup (e.g., setting up Face ID/Touch ID, transferring data later).
Your iPhone will now boot to the home screen with your newly created Apple ID, which is not yet fully verified with a phone number.
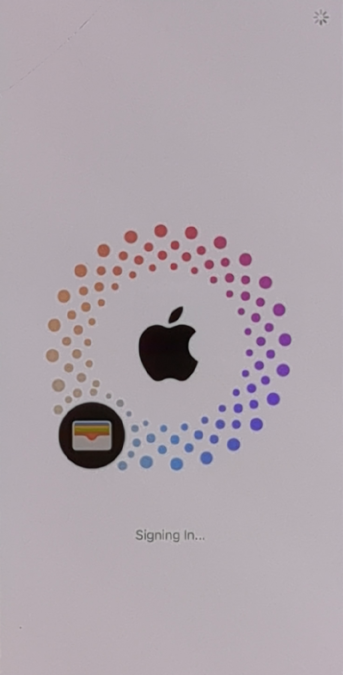
Apple id sign in
this is how we Fix: iCloud Verification Code Not Sending Philippines issue
Step 11: Turn Off Find My iPhone Temporarily
This step is essential to allow you to easily remove the temporary phone number later.
Go to Settings > [Your Name] (your new Apple ID profile).
Tap on Find My > Find My iPhone.
Turn Off Find My iPhone. You will be prompted to enter your Apple ID password to confirm.
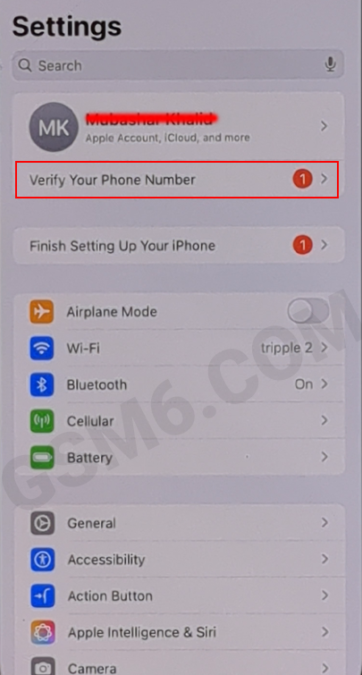
Step 12: Verify Your Real Philippine Number (Success!)
Now, the moment of truth for receiving Apple ID OTP in the Philippines!
Go back to Settings > [Your Name].
You should see an alert or option to Verify Phone Number. Tap on it.
Select Verify with a different number.
Choose Philippines as the country, then accurately enter your local Philippine phone number (e.g., your Smart, Globe, or DITO number).
You should now receive the OTP (One-Time Password) without any error! Enter the code to verify your number.
here we are close to fix iCloud Verification Code Not Sending Philippines issue.
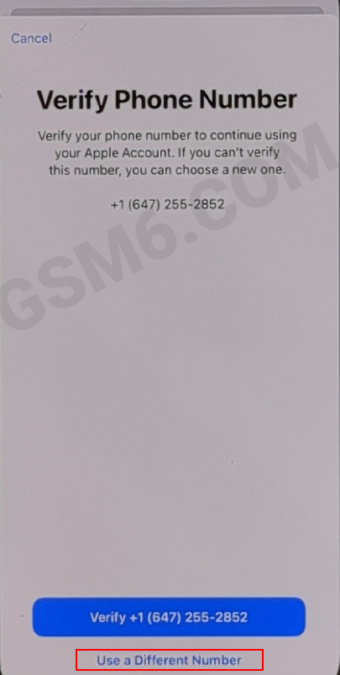
use a different number for apple id verification
Fixed: iCloud Verification Code Not Sending Philippines
we are continuing the guide iCloud Verification Code Not Sending Philippines
If OTP is Not Received (Troubleshooting for PH Numbers):
Check Signal: Ensure your Philippine SIM card has a strong mobile signal.
Restart Device: A quick reboot can sometimes resolve temporary network glitches.
Reinsert SIM: Carefully remove and reinsert your SIM card.
Different PH Number: If you have access to another Philippine phone number (not associated with any other Apple ID), try verifying with that one.
Carrier Specific: While rare, some temporary blocks can occur with specific carriers (Smart, Globe, DITO). Ensure your carrier isn’t having service issues.
Step 13: Remove Temporary Number
Once your Philippine number is verified, it’s time to remove the temporary US/Canada number.
Go to Settings > [Your Name] (Apple ID) > Sign-In & Security > Two-Factor Authentication.
Under “Trusted Phone Numbers,” tap Edit.
Tap the red minus icon next to the temporary US/Canada number, then select Remove.
Step 14: Change Country Back to Philippines
Now that your Apple ID is fully set up and verified with your Philippine number, you can change your App Store and iTunes Store region back.
Open the App Store.
Tap on your profile icon (top right corner).
Tap on your Apple ID (your name/email) > Country/Region.
Select Change Country or Region, then choose Philippines.
Step 15: Set Payment Method to None & Enter PH Address
On the Country/Region screen for the Philippines, you’ll be prompted to set up a payment method. Select None for the payment method.
Carefully enter your real and accurate Philippine address and zip code. You can use Google Maps or a quick search to find the correct ZIP code if needed. This is important for App Store functionality.
Step 16: Test Your Apple ID!
Download any free app from the App Store. This final test confirms that your Apple ID is fully working with your own Philippine phone number and local App Store access.
Congratulations! You now have a fully functional Apple ID with your own Philippine phone number and access to the local App Store, ready for all your iOS needs.
Final Troubleshooting & Advanced Tips for Apple ID Verification
Even with the most robust guide, some users might face unique challenges. Here are additional tips for resolving Apple ID verification code issues in the Philippines:
Ensure Your PH Number is Truly New: Double-check that your Philippine phone number has never been associated with any other Apple ID, even temporarily or if it was an old, forgotten account. Apple’s system can be strict about this.
Check Carrier SMS Filtering: Rarely, your mobile carrier (Smart, Globe, DITO) might temporarily filter incoming SMS from unknown or international senders. Check your spam/junk SMS folders on your phone, or contact your carrier if you’re consistently not receiving any SMS, not just from Apple.
Time of Day: Sometimes, Apple’s servers might be under heavy load. If you encounter repeated issues, try again after a few hours or during off-peak times.
Network Connectivity: Ensure your Wi-Fi is stable and, if possible, try on a different Wi-Fi network or even mobile data (briefly, just for the OTP) if Wi-Fi seems problematic.
Software Glitches: While rare, a minor iOS glitch could occur. Ensure your iOS 18 version is the absolute latest point release.
Reset Network Settings: Go to Settings > General > Transfer or Reset iPhone > Reset > Reset Network Settings. This can sometimes clear network-related issues preventing OTP delivery. (Note: This will reset Wi-Fi passwords and cellular settings).
Apple System Status: Before panicking, occasionally check Apple’s System Status page (search “Apple System Status” on Google). Look for any reported issues with “Apple ID” or “iCloud.”
Contact Apple Support (Last Resort): If, after exhausting all these steps, you are still unable to receive the Apple ID OTP in the Philippines, it might be time to contact Apple Support directly. Be prepared to explain the steps you’ve already taken.
that is all step-by-step guide to fix the issue “iCloud Verification Code Not Sending Philippines”
this solution is based on following queries.
apple id otp not received philippines
fix apple id verification ios 18
could not connect to icloud error philippines
apple id setup failed ph
create apple id without us number philippines
iphone not receiving verification code apple id
apple id bypass phone number verification philippines
icloud verification code fix 2025
apple id phone number verification failed philippines
philippine apple id setup guide
how to create apple id in philippines
icloud not sending code to smart
icloud not sending code to globe
icloud not sending code to dito
apple id verification workaround philippines
ios 18 apple id issues
apple id sms verification failed philippines
fix apple account verification ph
iCloud verification code not arriving
Unable to create apple id, retry later
Step-by-Step Video guide: Apple ID Phone Number Verification in Philippines (iOS 18, 2025)
Video Tutorial
Watch this guide for visual instructions
Uploaded: May 30, 2025
Share This Guide!
Know someone in the Philippines struggling with the persistent Apple ID verification code issue? Is their iPhone not receiving Apple ID OTP? Or are they frustrated with the “Could not connect to iCloud” error? Share this definitive 2025 guide with them! Help others fix their Apple ID setup problems in the Philippines in minutes!
Frequently Asked Questions
Why doesn’t Apple send verification codes to PH numbers during initial setup?
Apple sometimes restricts local numbers during initial setup due to a combination of factors, including regional security protocols, fraud prevention measures, or temporary carrier-specific limitations in the Philippines. Our method bypasses this initial restriction by leveraging a more globally streamlined verification pathway, allowing you to later successfully verify your actual Philippine number.
Is this method 100% safe for my Apple ID?
Yes, absolutely! This method is 100% safe and fully within Apple’s guidelines. It does not involve any jailbreaking, using unauthorized software, or engaging in any “shady” workarounds. You are simply leveraging existing functionalities in a specific sequence to resolve a regional verification challenge. Your Apple ID will be permanent, fully valid, and secure.
Will my Apple ID be permanent after this process?
Yes. Once you have successfully verified your real Philippine phone number and removed the temporary US/Canada number, your Apple ID is fully valid, permanent, and functions just like any other Apple ID created directly in your region. You will have full access to iCloud services, the App Store, iTunes, and all other Apple ecosystems.
Can I use this method for older iOS versions (e.g., iOS 17, iOS 16 or IOS 15)?
While this guide is optimized for iOS 18 and newer, the underlying principle of changing the region temporarily during setup is often effective for previous iOS versions as well. The specific steps might have slight UI variations, but the core strategy should remain applicable. so its a “Maybe” you can try & share your Experience.
What if I don’t have a new iPhone and want to fix this on my existing device without erasing data?
This guide specifically targets the initial setup phase where the verification code issue is most common. If you already have an existing Apple ID that suddenly stopped sending OTPs after initial setup, the problem might be different (e.g., network issues, carrier blocking, or issues with your Apple ID security settings). For such cases, try the “Verify Your Real Philippine Number” (Step 12) section directly, or refer to general Apple ID troubleshooting guides first. However, a full reset is often the most reliable fix for persistent setup issues.
How long does the entire process take?
The entire process, including resetting your iPhone and going through all the steps, typically takes around 10 to 15 minutes, assuming you have a stable internet connection and follow the instructions carefully.

Author:
Abdul MalikMobile Software Expert and founder of GSM6.com. Specializes in FRP bypass, IMEI repair, and advanced mobile tools. All tutorials are tested on real devices for accuracy and safety.