• Abdul Malik (AM) • android • 1 min
How to Enable Diag Port on Qualcomm Phones: Easy Guide (2025)
Introduction: Unlock Advanced Capabilities
How to Enable Diag Port on Qualcomm Android Phones (2025): Are you an advanced user, technician, or mobile enthusiast looking for a complete, step-by-step guide on how to enable Diag Port on Qualcomm Android devices? You’ve found the ultimate resource! This expert tutorial from GSM6.com meticulously reveals all working methods to activate Qualcomm Diagnostic Mode (also known as Diag Port or Diag Mode) for critical operations like firmware flashing, network unlocking, IMEI repair, NV data backup, and advanced debugging.
Mastering Diag Mode is crucial for deep-level smartphone maintenance and troubleshooting. By the end of this in-depth guide, you’ll have a clear understanding and actionable steps for:
œ… What the Qualcomm Diag Port is and its essential functions for phone repair.
œ… All proven methods to enable Diag Mode: including secret dialer codes, ADB commands, QPST/QFIL, Shortcut Maker, and Engineering Mode.
œ… Device-specific tricks for popular brands like Samsung, Xiaomi, Oppo, Realme, OnePlus, and more.
œ… Effective troubleshooting strategies to fix common Diag port issues.
œ… Best tools and drivers required for successful Qualcomm diagnostics.
Let’s dive in and unlock the hidden potential of your Qualcomm device!
Understanding the Qualcomm Diag Port: What It Is & Why It’s Essential for Your Phone
The Diagnostic Port (Diag Port) is a hidden, low-level communication interface present in Qualcomm-powered Android devices. Unlike standard USB connections (like MTP or PTP), the Diag Port provides direct access to your phone’s modem, firmware, and system partitions, allowing for advanced, otherwise inaccessible, operations.
Key Uses and Benefits of Activating Diag Mode:
Firmware Flashing & Unbricking: Crucial for flashing stock ROMs or custom firmware, often used in conjunction with EDL Mode (Emergency Download Mode) to unbrick devices or revert to factory settings.
IMEI Repair & NV Data Backup/Restore: Essential for fixing invalid IMEI or IMEI null errors, restoring corrupted NV items (Non-Volatile memory containing critical configuration data), and backing up your unique device identifiers.
Carrier & Network Unlocking: Enables the removal of carrier locks and allows for the activation of additional LTE/5G bands (band unlocking) for global network compatibility.
Modem Debugging & Testing: Provides raw access to modem logs and functionalities, indispensable for advanced network testing and troubleshooting cellular connectivity issues.
Partition Access & Manipulation: Allows reading from and writing to critical modem partitions such as
modemst1,modemst2,fsg, andefs, which store vital network and device data.
Which Devices Support Diag Mode?
Most smartphones equipped with Qualcomm Snapdragon processors generally support a Diagnostic Mode. This includes a vast range of chipsets:
Latest Snapdragon: Snapdragon 8 Gen 3, 8 Gen 2, 8 Gen 1, 888, 865, 778G, 695, 4 Gen 2, etc.
Mid-Range Snapdragon: Snapdragon 480, 680, 720G, 750G, 730G, etc.
Older Snapdragon: Snapdragon 845, 835, 660, 625, 430, etc.
Important Note: While Qualcomm chipsets support this, some manufacturers (e.g., Samsung, Huawei, newer Xiaomi devices) may block or severely restrict direct Diag Port access in their latest Android versions or specific device models for security reasons. Our guide will provide alternative methods for such cases.
Qualcomm HS-USB Diagnostics
How to Enable Diag Port on Qualcomm Phones: All Working Methods
This section covers various techniques to activate the Diagnostic Port on your Qualcomm Android device. Start with the simpler methods and progress to more advanced ones if needed.
Method 1: Enable Diag Port Using Secret Dialer Codes (No PC Needed)
Many Qualcomm-powered Android devices, especially older or specific regional models, have hidden dialer codes that can directly activate Diag Mode without needing a computer. This is often the easiest method if it works for your device.
Step-by-Step Guide:
Open the Phone Dialer application on your device.
Enter one of these common secret codes. The specific code varies by manufacturer and Android version:
*#*#DEBUG#*#*(or##DEBUG##) “ A generic code that works on many diverse Android devices.*#*#3424#*#*“ Commonly used for Samsung diagnostic menu access.*#*#717717#*#*“ Frequently used for Xiaomi/Redmi/POCO Diag Mode activation.*#*#83781#*#*“ Often triggers Oppo/Realme/OnePlus test mode or engineering menu.*#801#“ Another code for Oppo / OnePlus to access engineer mode.*#8011#“ May work for Oppo / OnePlus / Realme.*#556#“ Sometimes found on Vivo / older models.*#0808#“ For Samsung USB mode selector, where you can sometimes enable “DM + MODEM + ADB” mode.*#9090#“ For Samsung service mode, which may offer diagnostic port options.
If a code successfully triggers a menu, look for options like “Diag Mode,” “Port Settings,” “USB Settings,” or “DM Port Enable.” Select the appropriate option to enable the diagnostic port.
Reboot your device (if not automatically done).
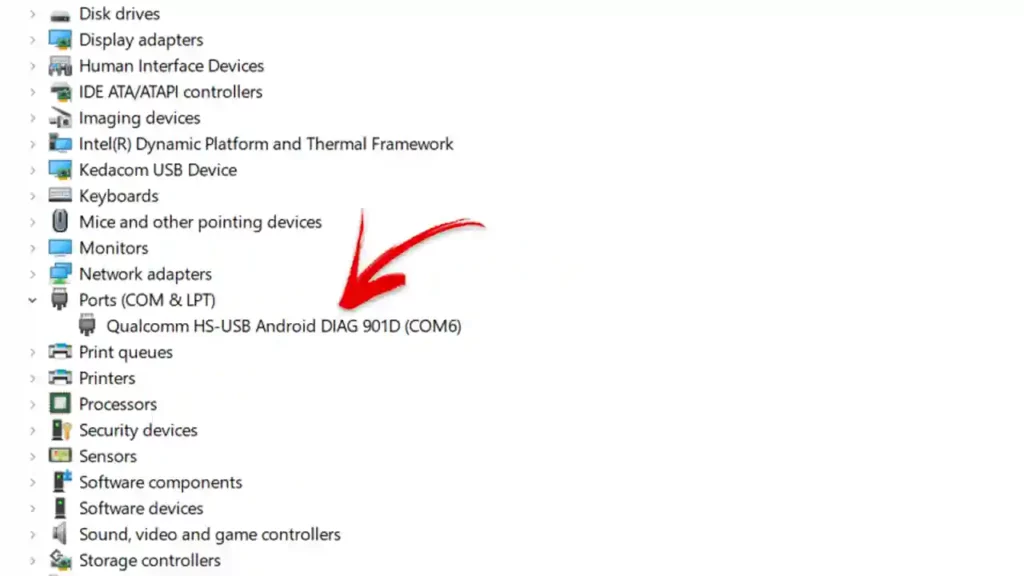
Verify: Connect your phone to a PC. Open Device Manager on your PC and look under “Ports (COM & LPT)” for “Qualcomm HS-USB Diagnostics 9008” or a similar entry.
Important Note: Many manufacturers disable these secret codes in newer Android versions or customize them. If these codes don’t work, proceed to Method 2.
Method 2: Enable Diag Port via ADB (Android Debug Bridge) - No Root Required
If dialer codes prove ineffective, ADB (Android Debug Bridge) is a highly reliable next step. This method does not typically require your device to be rooted, only that USB Debugging is enabled.
Step-by-Step Guide:
Enable USB Debugging & OEM Unlocking on Your Phone:
Go to
Settingson your device.Scroll to
About Phoneand repeatedly tap on “Build Number” 7 times until “Developer Options” is enabled.Navigate back to
Settings, thenSystem(or directly find)Developer Options.Inside Developer Options, enable
USB Debuggingand alsoOEM Unlocking(the latter is good practice for advanced operations, even if not strictly required for Diag Mode).
Install ADB & Fastboot Drivers on Your PC:
Download Minimal ADB & Fastboot (or the full Android SDK Platform-Tools) from a reliable source.
Download Qualcomm USB Drivers separately.
Extract the downloaded ZIP files and install both packages on your Windows PC. Reboot your PC after installation if prompted.
Connect Phone & Open Command Prompt:
Connect your Android phone to your PC using a high-quality USB cable. When prompted on your phone, select “File Transfer (MTP)” mode or “Charging only” and grant USB Debugging permission if a pop-up appears.
Navigate to the folder where you installed ADB & Fastboot (e.g.,
C:\adb).Open Command Prompt (CMD) as Administrator in that folder (Right-click within the folder > Open in Terminal/Command Prompt, or type
cmdin address bar and press Enter).
Execute ADB Commands:
First, confirm your device is detected by ADB:
adb devices(You should see your device’s serial number listed.)If detected, proceed with the following commands to enable Diag Mode. The exact command varies by device and Android version:
adb shellsu -c "setprop persist.sys.usb.config diag,adb"(Press Enter after each line. Note:su -crequires root access. If not rooted, try the next commands.)Alternative ADB Commands (No Root Required, More Common for Newer Devices):
adb shell setprop sys.usb.config diag,adb(This attempts to set the USB configuration directly. If this works, your PC should immediately detect the Diag port.)adb reboot(After running thesetpropcommand, a reboot often solidifies the change.)
Pro Tip: If ADB doesn’t recognize your device (e.g., adb devices shows no devices), you might need to install Universal ADB Drivers or specific OEM drivers.
Method 3: Enable Diag Port Using QPST / QFIL (Advanced Users - Most Reliable)
QPST (Qualcomm Product Support Tools) and its component QFIL (Qualcomm Flash Image Loader) are powerful tools. This method is often the most reliable for forcing Diag Mode, especially when other methods fail, and is frequently used in conjunction with EDL Mode (Emergency Download Mode).
Step-by-Step Guide:
Install Qualcomm USB Drivers:
Ensure you have the latest Qualcomm HS-USB Drivers installed on your PC.
Reboot your PC after driver installation to ensure they are fully loaded.
Download & Install QPST / QFIL Tools:
Download the complete QPST 2.7.496 (or latest stable version) suite.
Install the QPST suite on your PC.
Boot Phone into EDL Mode (Emergency Download Mode - Essential for QPST):
Power off your device completely.
Simultaneously press and hold Volume Up + Volume Down + Power Button for approximately 5-10 seconds.
The device screen will typically remain black (this is normal and indicates EDL mode).
Connect your phone to your PC via USB.
Verify in Device Manager: Check for “Ports (COM & LPT)” and look for “Qualcomm HS-USB QDLoader 9008”. This confirms your device is in EDL mode.
Add Diag Port in QPST (If not automatically detected):
Open
QPST Configuration(found in your Start Menu after installing QPST).Go to the
Portstab.Click “Add New Port” and select the COM port corresponding to your “Qualcomm HS-USB QDLoader 9008” device.
If successful, you’ll see your device listed under active ports, often showing “Diagnostics” in its status.
Enable Diag Mode via QFIL (Alternative within QPST Suite):
Open
QFIL(Qualcomm Flash Image Loader), also part of the QPST suite.Ensure your device’s COM port (QDLoader 9008) is selected at the top.
QFIL can sometimes force a Diag Port connection even without a full firmware flash. This typically involves selecting a “Flat Build” or “Meta Build” and loading a minimal Sahara or Firehose programmer, then clicking “Download.” This is an advanced step and requires specific files/knowledge.
Warning: Flashing incorrect firmware or using QFIL improperly can brick your device permanently. Only proceed with this specific QFIL method if you have precise instructions for your device model and the necessary files.
Method 4: Enable Diag Port Using Shortcut Maker Apps (No Root Required - User-Friendly)
For many non-rooted devices, especially consumer-friendly models, certain “Shortcut Maker” or activity launcher applications can expose hidden system activities that enable Diag Mode.
Step-by-Step Guide:
Install a Shortcut Maker App:
- Download and install a reliable “Shortcut Maker” or “Activity Launcher” app from the Google Play Store (e.g., Activity Launcher, QuickShortcutMaker).
Open the App & Search:
Launch the installed app.
Go to “App Explorer” or “Activities.”
In the search bar, type keywords like:
DiagUSBPortEngineeringService
Find & Launch Diag Enable Activity:
Look for activities with titles like “Diag USB Enable,” “USB settings,” “Engineer Mode,” or “DM Port.”
Tap on the relevant activity and then click “Launch” or “Try.”
Reboot & Verify:
Reboot your device if the changes aren’t immediate.
Connect to PC and check Device Manager for the “Qualcomm HS-USB Diagnostics” port.
Works On: This method has been reported to work on various Samsung, LG, Xiaomi, Motorola, and some Vivo/Oppo devices where manufacturers haven’t completely locked down the diagnostic activities.
Method 5: Enable Diag Port via Engineering Mode (Common for MTK & Some Qualcomm)
Many Android devices, particularly those with MediaTek (MTK) chipsets but also some Qualcomm, include a hidden Engineering Mode that allows deeper system configuration, including enabling the Diagnostic Port.
Step-by-Step Guide:
Dial Codes in Phone App:
Open your phone’s dialer app.
Try one of these codes:
*#*#3646633#*#*“ The most common MediaTek Engineering Mode code.*#*#4636#*#*“ General Android Testing Menu, sometimes leads to options.*#*#8255#*#*“ GTalk Service Monitor (less likely for Diag but worth noting).
Navigate to USB/Port Settings:
Once in Engineering Mode (or a similar hidden menu), navigate through options like:
“Connectivity” †’ “CDS Information” †’ “Radio Information”
“Hardware Testing” †’ “USB”
Look for “Phone Control” or “Port Settings.”
Select “USB Port Settings” and choose an option that includes “Diag” or “Modem” (e.g., “Diag + Modem” or “UART + DM”).
Reboot & Verify:
Reboot your device to apply the changes.
Connect to PC and check Device Manager for the Qualcomm Diag Port.
Note: The availability and navigation within Engineering Mode vary significantly by device model and firmware. Not all devices support this method.
Video Tutorial
Watch this guide for visual instructions
Uploaded: April 12, 2025
Troubleshooting: Diag Port Not Showing Up or Disappearing? (Common FIXES)
If your Qualcomm Diag Port isn’t detected, disappears unexpectedly, or you’re facing connection issues, these troubleshooting steps can help resolve the problem:
Install/Reinstall Correct USB Drivers:
This is the most common reason for detection issues. Ensure you have the latest and correct Qualcomm HS-USB Drivers installed. For Samsung, use Samsung USB Drivers. For Xiaomi, Xiaomi USB Drivers.
Consider temporarily disabling Driver Signature Enforcement in Windows (search for “Advanced Startup Options” on how to do this for your Windows version) before installing drivers, then re-enable it.
Use a USB 2.0 Port (Avoid USB 3.0/3.1/3.2):
- Many Diag tools and low-level communication protocols are more stable and sometimes only work reliably on older USB 2.0 ports. If you’re using a blue USB port, try a black one.
Check Device Manager for Unknown Devices:
Even if not listed under “Ports,” your device might appear as an “Unknown Device” or with a yellow exclamation mark under “Other devices.”
Right-click on the “Unknown Device” †’ Update Driver †’ Browse my computer for drivers †’ Let me pick from a list of available drivers †’ Select “Qualcomm HS-USB Diagnostics” or “QDLoader 9008” if available, or try “Have Disk” and point to your extracted driver folder.
Try Different USB Cables:
- Some USB cables are “charge-only” and do not support data transfer. Always use a high-quality, data-transfer capable USB cable, preferably the original one that came with your phone.
Disable Driver Verification (Temporary Windows Tweak):
This is a last resort if driver issues persist. It temporarily allows unsigned drivers.
Open Command Prompt (CMD) as Administrator.
Run:
bcdedit.exe /set nointegritychecks onReboot your PC.
After you’re done with your Diag operations, it’s highly recommended to re-enable it by running:
bcdedit.exe /set nointegritychecks off
Reboot Both PC and Phone: A simple restart can often resolve temporary glitches.
Try Different Software Versions: If one version of QPST or a specific ADB command isn’t working, search for slightly older or newer versions that might be more compatible with your specific Android version or device model.
Frequently Asked Questions
What is the Qualcomm Diag Port used for in phone repair?
The Qualcomm Diag Port (Diagnostic Mode) is a hidden interface used for advanced smartphone repair. Its main uses include IMEI repair (fixing invalid or null IMEI), NV data backup/restore, network unlocking, firmware flashing (often via EDL Mode), and modem debugging for troubleshooting cellular issues on Qualcomm-powered Android devices.
Can I enable Diag Port on my Xiaomi, Realme or Oppo phone?
Yes, you can enable the Diag Port on many Xiaomi, Oppo, Realme, and other Qualcomm-powered phones. While some newer models or specific Android versions might have restricted access, our guide covers multiple methods including secret dialer codes, ADB commands, QPST/EDL mode, and Shortcut Maker apps to help you activate it.
Is rooting my phone required to enable Diag Mode?
No, rooting is not always required to enable the Diag Port. Many methods, such as using secret dialer codes, ADB commands (without su), or Shortcut Maker apps, can activate Diag Mode on non-rooted devices. However, some advanced operations or specific device models might benefit from or require a bootloader unlock.
What is EDL Mode and how is it related to Diag Port?
EDL (Emergency Download Mode) is a critical low-level mode on Qualcomm devices that allows flashing of firmware even on bricked phones. When a device is in EDL Mode, it presents itself to the PC as a “Qualcomm HS-USB QDLoader 9008” port. This 9008 port is distinct from the regular Diag Port, but tools like QPST/QFIL often leverage EDL Mode to establish communication and then switch to or activate a Diag Port for advanced operations like IMEI repair.
I’m getting “Device Not Detected” when trying to enable Diag Port. What should I do?
This is a very common issue. First, ensure you have the correct Qualcomm USB Drivers installed and try rebooting your PC. Use a USB 2.0 port instead of USB 3.0, and try a different USB cable. Also, verify your phone is correctly in the required mode (e.g., Download Mode, Meta Mode, or EDL Mode if using QPST).
Can enabling Diag Port damage my phone?
Enabling the Diag Port itself is generally safe. However, the operations performed while in Diag Mode (such as flashing incorrect firmware, corrupting NV data during IMEI repair, or improper partition manipulation) carry significant risk and can potentially brick your device if not done correctly. Always follow guides meticulously and proceed with caution.
How to Enable Diag Port on Qualcomm Phones SAMSUNG?
Samsung has a bit different method to enable diag port, dial *#9090# in stock dialer for samsung phones.
Final Thoughts: Empowering Your Qualcomm Device Diagnostics
Enabling the Diag Port on Qualcomm devices is an essential skill for advanced users and technicians who need deep-level access for firmware flashing, IMEI repair, network unlocking, and advanced debugging. This comprehensive guide has covered all possible working methods in detail, from simple secret codes to advanced QPST/EDL techniques.
By mastering these methods, you gain unparalleled control over your Qualcomm Android smartphone, enabling you to resolve complex software and connectivity issues.
If you still face any challenges or have further questions, don’t hesitate to comment below, and our experts will do their best to assist you!
Bookmark GSM6.com for more expert Qualcomm tutorials and mobile repair guides!

Author:
Abdul MalikMobile Software Expert and founder of GSM6.com. Specializes in FRP bypass, IMEI repair, and advanced mobile tools. All tutorials are tested on real devices for accuracy and safety.