• Abdul Malik (AM) • android • 1 min
Flash Google Pixel without Unlocking Bootloader: ADB Sideload 2026
Are you a Google Pixel owner looking for the fastest, safest, and most efficient way to keep your device updated? Frustrated by waiting for over-the-air (OTA) updates to roll out to your region, or simply want more control over your phone’s software? Look no further! This comprehensive guide from GSM6.com will walk you through the process of flashing official Google Pixel updates using ADB sideload, all without the need to unlock your bootloader or risk losing your precious data.
![]()
Why Sideload Your Google Pixel Updates? The Benefits of Taking Control
While Google’s automatic OTA updates are undeniably convenient, they aren’t always immediate. Updates often roll out in stages, meaning some users receive them weeks before others. If you’re eager to experience the latest Android features, security patches, or simply want to troubleshoot a software glitch, sideloading offers several compelling advantages for the savvy Pixel user:
ADB Sideload Benefits
| Benefit | Description | Impact |
|---|---|---|
| Instant Updates | Get latest Android versions before staged rollout | No waiting for OTA deployment |
| Bypass Staged Rollouts | Skip Google’s phased update distribution | Immediate access to security patches |
| Data Preservation | Update without factory reset | All apps, settings, photos remain intact |
| Warranty Protection | No bootloader unlock required | Maintains device warranty coverage |
| Troubleshooting Tool | Fix software issues without full wipe | Resolve glitches, boot loops |
| Full Control | Manual update timing and version selection | Choose when and what to update |
Instant Access to Latest Updates: Be among the first to get the newest Android versions, crucial security patches, and exciting feature drops directly from Google. This often happens before they arrive via traditional staged OTA rollouts.
Bypass Staged Rollouts: Google frequently deploys updates in phases to monitor for unforeseen issues. ADB sideloading allows you to completely bypass these waiting periods and get your Pixel updated immediately.
Troubleshooting & Recovery: Is your Pixel experiencing unusual software glitches, performance issues, or even stuck in a boot loop? Sideloading a clean, official OTA image can often resolve these problems without the drastic measure of a full factory reset. It’s a powerful first step in diagnosing and fixing common software woes.
Preserve Your Data & Warranty: This is a critical benefit. Unlike flashing a full factory image (which typically requires an unlocked bootloader and wipes all your data), ADB sideloading an official OTA update preserves all your apps, settings, photos, and personal data. Furthermore, because you’re not unlocking the bootloader, your device’s security measures remain intact, and your warranty (if applicable) is generally not voided.
Understanding the Essentials: ADB, OTA Images, and Recovery Mode
Before we dive into the practical steps of how to flash your Google Pixel, let’s clarify a few key technical terms you’ll encounter. Understanding these basics will make the entire process smoother and more transparent.
Key Terminology
| Term | Definition | Purpose |
|---|---|---|
| ADB | Android Debug Bridge | Command-line tool for device communication |
| OTA Image | Over-The-Air update file | Incremental update from Google |
| Recovery Mode | Special bootable partition | System-level tasks and updates |
| Sideload | Install via ADB in Recovery | Update without OTA delivery |
| Bootloader | Initial startup program | Device security and boot management |
What You’ll Need: Your Pre-Flash Checklist
To successfully flash your Google Pixel via ADB sideload, gather the following essential tools and files:
Required Materials Checklist
| Item | Details | Importance |
|---|---|---|
| Google Pixel | Pixel 6/7/8 series, Pro, Fold, a-series | Must have ‰¥50% battery |
| Computer | Windows, macOS, or Linux | For running ADB commands |
| USB-C Cable | Data-transfer capable | High-quality cable essential |
| Platform Tools | ADB & Fastboot utilities | Latest version recommended |
| OTA Image | Official Google .zip file | Exact match for model/version |
| Drivers | Android USB Drivers (Windows) | For device recognition |
A Google Pixel Phone: This guide applies to a wide range of Pixel devices, including the Pixel 6, Pixel 7, Pixel 8, Pixel 6a, Pixel 7a, Pixel 8a, and their Pro and Fold variants. Ensure your device has at least 50% battery charge to prevent any power interruptions during the update process.
A Computer (Windows, macOS, or Linux): You’ll use your computer to run the ADB commands.
USB-C Cable: A high-quality, data-transferring USB-C to USB-A or USB-C to USB-C cable is essential for a stable connection between your Pixel and your computer. Avoid using charging-only cables.
Android SDK Platform-Tools: This package contains the necessary ADB and Fastboot utilities.
Official Google Pixel OTA Image: The specific
.zipupdate file for your Pixel model and, importantly, an update that is newer than your phone’s current Android version.
Step-by-Step Guide: How to Flash Google Pixel without unlocking bootloader (No Data Loss!)
Follow these instructions carefully to ensure a smooth and successful update process for your Pixel phone.
Step 1: Prepare Your Computer for ADB Sideload
First, we need to set up your computer with the necessary tools to communicate with your Pixel.
Download Android SDK Platform-Tools:
get from official Google Developers website or follow this Article.
Download the appropriate ZIP file for your computer’s operating system (Windows, macOS, or Linux).
Once downloaded, create a new, easily accessible folder on your computer (e.g.,
C:\platform-toolson Windows, or a folder namedplatform-toolsin your home directory on macOS/Linux).Extract the entire contents of the downloaded ZIP file into this newly created
platform-toolsfolder. This folder will now contain theadb.exe(oradbon Mac/Linux) executable.
Install ADB Drivers (Windows Only):
For Windows users, proper ADB drivers are crucial for your computer to recognize your Pixel. Often, simply connecting your phone with USB debugging enabled (which we’ll do in Step 2) will prompt Windows to install generic drivers automatically.
If your device isn’t recognized, you may need to manually install the Google USB Driver. You can find instructions and the driver download within the Android SDK Manager (part of the larger Android Studio, or Google provides standalone instructions).
Tip: A simple way to check if drivers are working is to open Command Prompt in your
platform-toolsfolder (as explained in Step 4) and typeadb devices. If your device appears, your drivers are likely fine. (Download Compatible Android USB Drivers)
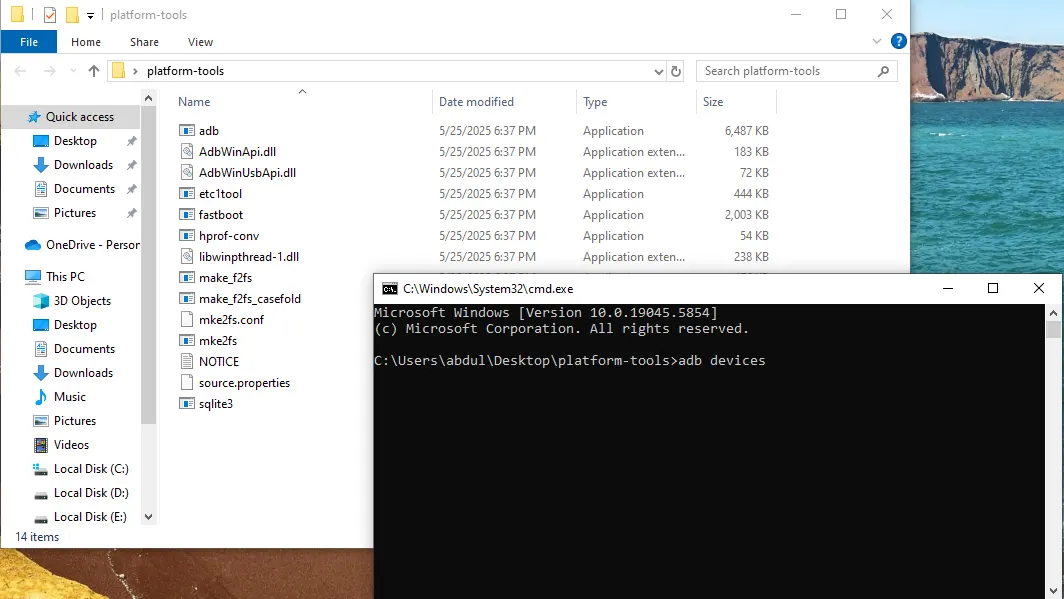
Platform tools
Step 2: Enable USB Debugging on Your Pixel Device
USB Debugging allows your computer to send commands to your Pixel. This setting is hidden by default.
USB Debugging Setup Steps
| Step | Action | Location |
|---|---|---|
| 1 | Enable Developer Options | Settings > About phone > Build number (tap 7x) |
| 2 | Access Developer Options | Settings > System > Developer options |
| 3 | Enable USB Debugging | Toggle USB debugging ON |
| 4 | Grant Permission | Allow USB debugging on connection prompt |
Enable Developer Options:
On your Google Pixel, open the Settings app.
Scroll down and tap on About phone.
Locate Build number and tap it rapidly seven (7) times. You’ll see a small message pop up saying, “You are now a developer!”
Enable USB Debugging:
Go back to the main Settings menu.
Tap on System (it might be under “Advanced” or “More settings” depending on your Android version).
Now, tap on Developer options (this new menu item will appear after step 1).
Scroll down and toggle on USB debugging.
When you connect your phone to your computer, you will likely see a pop-up on your Pixel asking to “Allow USB debugging?” Always check “Always allow from this computer” and tap Allow.
Step 3: Download the Correct Official OTA Image to Flash Google Pixel without unlocking bootloader
This is a critical step. Downloading the wrong file can cause issues.
OTA Download Guidelines
| Checkpoint | What to Verify | Why Important |
|---|---|---|
| Device Model | Exact Pixel model (e.g., Pixel 8 Pro) | Wrong model = flash failure |
| Current Build | Settings > About phone > Build number | Must upgrade from current version |
| Target Version | Newer than current build | Cannot downgrade via OTA |
| File Integrity | SHA-256 checksum verification | Prevents corrupted file issues |
| Source | developers.google.com/android/ota | Official Google source only |
Visit the Official Google OTA Page: Go to This Link for Official OTA Images =>> https://developers.google.com/android/ota
Find Your Device: Carefully scroll through the list and locate your specific Google Pixel model (e.g., Pixel 8 Pro, Pixel 7a, Pixel Fold). Double-check the codename to be sure (e.g., “oriole” for Pixel 6, “cheetah” for Pixel 7 Pro, “husky” for Pixel 8 Pro).
Choose the Correct Update File:
Crucially, you must download the OTA image that is newer than your current Android build number. You cannot “downgrade” your Pixel’s software or skip major Android versions using this method. For example, if you are on the March 2025 security patch (build number XYZ.2403xx.001), you must download the April 2025 patch (XYZ.2404xx.001) or newer.
Verify Your Current Build Number: On your Pixel, go to Settings > About phone > Build number. Make a note of this.
Compare the build numbers on the Google OTA page. Select the link for the update file that starts with your current build number and ends with the newer version you want.
Click the “Link” next to the desired update to download the
.zipfile.
Place the OTA File in
platform-tools: Once downloaded, move the OTA.zipfile (e.g.,raven-ota-ap1a.240305.001-a1b2c3d4.zip) into theplatform-toolsfolder you created in Step 1.- Tip: For simplicity in the commands, you can rename the
.zipfile to something shorter, likeupdate.zip, but ensure you keep the.zipextension.
- Tip: For simplicity in the commands, you can rename the
Step 4: Boot Your Pixel into Recovery Mode
Now, we’ll put your Pixel into a special mode where it can receive the update.
Recovery Mode Entry Methods
| Method | Steps | For |
|---|---|---|
| ADB Command | adb reboot recovery | Connected device with USB debugging |
| Hardware Keys | Power Off > Power + Vol Down > Recovery | Device not connecting to PC |
| Fastboot | fastboot boot recovery.img | Advanced users only |
Connect Your Phone: Use your USB-C cable to connect your Pixel to your computer.
Open Command Prompt (Windows) or Terminal (macOS/Linux):
Windows: Navigate to your
platform-toolsfolder. In the address bar of the folder (where it showsC:\platform-tools), typecmdand press Enter. This will open a Command Prompt window directly in that directory.macOS/Linux: Open a Terminal window. Type
cdfollowed by a space, then drag and drop yourplatform-toolsfolder directly into the Terminal window and press Enter.
Reboot to Recovery: In the Command Prompt/Terminal window, type the following command and press Enter: Bash
adb reboot recoveryYour Pixel will now reboot, and you should see an image of a small Android robot lying on its back with an exclamation mark and a “No command” message.Enter ADB Sideload Mode:
While on the “No command” screen, hold down the Power button and then quickly press the Volume Up button once. Release both buttons immediately.
This action will bring up the Android Recovery menu.
Use the Volume keys to navigate through the options until you highlight “Apply update from ADB.”
Press the Power button once to select this option.
Your phone’s screen will now change, indicating that it’s ready to receive a sideloaded package (e.g., “Now send the package you want to apply with ‘adb sideload
’…”).
Step 5: Sideload the Official OTA Update to Your Pixel / Flash Google Pixel without unlocking bootloader
This is the final step where the update file is transferred and installed.
ADB Sideload Process
| Stage | What Happens | Duration | Indicators |
|---|---|---|---|
| Connection | PC detects device in sideload mode | Seconds | adb devices shows “sideload” |
| Transfer | OTA .zip file sent to device | 2-5 minutes | Progress bar on both screens |
| Verification | File integrity and signature check | 1-3 minutes | May pause at 47% |
| Installation | System updates applied | 3-8 minutes | ”Installing update…” message |
| Completion | Update finalized, ready to reboot | Seconds | ”Install complete” message |
Verify Device Connection (Optional but Recommended): Before initiating the sideload, it’s a good idea to confirm your computer recognizes your Pixel in sideload mode. In your Command Prompt/Terminal, type: Bash
adb devicesYou should see your device listed, usually with “sideload” next to its serial number, confirming it’s properly connected and ready.Initiate Sideload: In the same Command Prompt/Terminal window, type the following command, replacing
update.zipwith the actual name of the OTA.zipfile you downloaded in Step 3: Bashadb sideload update.zip(Remember to replaceupdate.zipwith the actual filename if you didn’t rename it, e.g.,adb sideload raven-ota-ap1a.240305.001-a1b2c3d4.zip)Wait for Installation: The update process will now begin. You’ll see percentage progress indicators on both your computer’s command window and your Pixel’s screen as the file is transferred and installed. This process can take several minutes (typically 5-15 minutes) depending on the size of the update and your computer’s speed. It is absolutely crucial not to disconnect your phone or interrupt the process during this time.
Reboot Your Pixel: Once the installation is complete (you’ll see “Install complete” or similar messages on both screens), your Pixel will return to the Android Recovery menu. The “Reboot system now” option should be highlighted by default.
- Press the Power button to select “Reboot system now.” Your Pixel will restart.
![]()
flashing pixel via adb sideload screen
Step-by-Step Video Guide: Flash Google Pixel without unlocking bootloader
step by step visual guide to flash google pixel via adb sideload method.
Video Tutorial
Watch this guide for visual instructions
Uploaded: September 28, 2025
Post-Sideloading Tips & Verification:
Post-Update Verification
| Check | How to Verify | Expected Result |
|---|---|---|
| Build Number | Settings > About phone > Build number | Matches downloaded OTA version |
| Android Version | Settings > About phone > Android version | Updated to target version |
| Security Patch | Settings > Security & privacy > Security update | Latest patch date |
| Functionality | Test calls, data, apps, camera | All features working normally |
| Future OTA | Check for updates in Settings | System reports up to date |
First Boot: The first boot after an update might take a bit longer than usual as the system optimizes newly installed apps and prepares the environment. Be patient.
Verify Update: Once your phone boots up, go to Settings > About phone > Android version to confirm that the update was successfully installed and check the new build number.
Future Updates: You will continue to receive future OTA updates normally after sideloading, as long as you’re using official Google OTA images. Your device’s ability to receive future updates is not affected.
Important Considerations & Warnings:
While flashing your Google Pixel via ADB sideload is generally safe and data-preserving, it’s essential to keep the following in mind:
Safety Guidelines
| Guideline | Reason | Consequence if Ignored |
|---|---|---|
| Battery ‰¥50% | Prevents shutdown during flash | Bricked device, data loss |
| Official OTA only | Ensures compatibility, security | Boot loop, malware risk |
| No interruption | Allows complete installation | Corrupted system, soft brick |
| Correct model/file | Matches device hardware | Flash failure, device issues |
| Quality USB cable | Stable data transfer | Failed transfer, errors |
Data Backup: Even though sideloading an OTA image usually preserves data, it is always a good practice to back up your important data (photos, contacts, app data) before performing any system-level flashing procedure. Better safe than sorry!
Battery Life: Ensure your phone has sufficient battery (at least 50%, ideally more) to prevent unexpected shutdowns during the update process. A power interruption during flashing could lead to software issues or, in rare cases, a bricked device.
Stable Connection: Use a reliable, high-quality USB cable. Avoid any interruptions to your computer’s power or the USB connection during the sideload.
Official Sources Only: Always, always download OTA files exclusively from Google’s official developer website [x url=“https://developers.google.com/android/ota”\]. Never use unofficial or third-party sources, as they could contain malicious software, corrupted files, or incorrect versions, potentially harming your device.
Correct File: Double-check that you’ve downloaded the exact OTA file for your specific Pixel model and that it’s the correct version to upgrade from your current build. Flashing an incorrect file can lead to software issues, boot loops, or even bricking your device.
Bootloader Lock: This method specifically does not require unlocking your bootloader, which means your device’s fundamental security remains intact. This is a significant advantage for users who wish to maintain their device’s out-of-the-box security features and avoid voiding their warranty (if applicable).
By meticulously following these steps and adhering to the important considerations, you can confidently and safely keep your Google Pixel updated with the very latest software, taking full control of your device’s upgrade path without compromising its security or your valuable data. Happy flashing!
Frequently Asked Questions
What is the main difference between sideloading an OTA update and flashing a factory image on my Pixel?
The core difference lies in their purpose and impact on your data. ADB Sideloading an OTA Update: This method applies an incremental update from Google. It’s designed to seamlessly update your Pixel from one build number to a newer one without wiping your personal data or requiring an unlocked bootloader. It’s like applying a patch. Flashing a Factory Image: This method installs a complete software image, essentially returning your Pixel to its “factory state.” This process typically requires an unlocked bootloader and will wipe all data from your device. It’s used for fresh installations, downgrading (which is generally not recommended and more complex), or if your device is severely bricked.
Will sideloading an official OTA update wipe my data?
No, sideloading an official OTA .zip file from Google’s developer website using the ADB sideload method will NOT wipe your personal data. This is one of the primary benefits of using this method over flashing a full factory image. Your apps, photos, contacts, and settings will remain intact.
Do I need to unlock my Pixel’s bootloader to use ADB sideload?
No, you do NOT need to unlock your Pixel’s bootloader to sideload an official OTA update. This is a significant advantage as it keeps your device’s security features active and does not void your warranty (if applicable). Only flashing full factory images or custom ROMs typically requires an unlocked bootloader.
Is ADB sideloading safe for my Google Pixel?
Yes, when done correctly with official OTA update files downloaded directly from Google’s developers website, ADB sideloading is a safe and reliable method to update your Pixel. The primary risks come from using incorrect files, unofficial sources, or interrupting the process. Always ensure your downloaded .zip file is for your exact Pixel model and is a newer version than your current software.
My ADB sideload got stuck at 47% or showed an error. What should I do?
If your ADB sideload gets stuck (often at 47%) or fails, don’t panic. This is a common point where the transfer finishes and the device starts verifying the package. Patience is Key: Sometimes the progress bar on your computer stops, but your phone is still working in the background. Give it a few more minutes. Verify Checksum: The most common reason for failure is a corrupted download. Redownload the OTA .zip file from Google’s site and verify its SHA-256 checksum against the one provided on the website before trying again. USB Cable/Port: Try a different USB cable or a different USB port on your computer. ADB Drivers: Ensure your ADB drivers are correctly installed and updated on your computer (especially for Windows users). Start Over: Reboot your phone to recovery mode, re-select “Apply update from ADB,” and try the sideload command again.
How do I find my Google Pixel’s current build number?
You can easily find your Pixel’s build number by following these steps: Open your Pixel’s Settings app. Scroll down and tap About phone. Scroll down again, and you will see “Build number.” This alphanumeric code (e.g., UP1A.231005.007) tells you the exact version of the Android software currently running on your device. You’ll need this to download the correct OTA file.
Can I downgrade my Pixel’s Android version using ADB sideload?
No, you generally cannot downgrade your Pixel’s Android version using the ADB sideload method with an OTA update file. OTA updates are designed for incremental upgrades. If you need to revert to an older Android version, you typically have to flash a full factory image, which requires an unlocked bootloader and will completely wipe your device’s data.
Will sideloading affect my Pixel’s ability to receive future OTA updates automatically?
No, sideloading an official OTA update does not interfere with your Pixel’s ability to receive future over-the-air updates directly from Google. Once your device is updated to the latest available software via sideload, it will continue to receive future official OTA notifications as they become available for your specific model and region.
What Pixel models support ADB sideload?
All Google Pixel devices from Pixel 1 to latest Pixel 9 series support ADB sideload. This includes Pixel, Pixel XL, Pixel 2-9 series, Pro models, a-series, and Fold devices. The process is identical across all models.
How long does ADB sideload take?
The complete process typically takes 10-20 minutes: 2-5 minutes for file transfer, 5-10 minutes for installation, plus 2-5 minutes for first boot optimization. Larger updates or older computers may take longer.
Can I sideload on Mac or Linux?
Yes, ADB sideload works on Windows, macOS, and Linux. The commands are identical. Mac and Linux users don’t need to install separate USB drivers in most cases.
What if I get “error: device unauthorized”?
This means USB debugging isn’t properly authorized. On your Pixel, check for “Allow USB debugging?” prompt and accept it. If no prompt appears, revoke USB debugging authorizations in Developer Options and reconnect.
Is internet required for ADB sideload?
No, internet is only required to download the OTA file and Platform Tools. The actual sideload process works completely offline via USB cable.
Can I interrupt the sideload process?
Never intentionally interrupt ADB sideload. If process fails or gets stuck, wait several minutes, then force reboot (Power + Vol Down). You may need to factory reset if system is corrupted.
What’s the difference between OTA and Full OTA?
Regular OTA: Incremental update from specific version. Full OTA: Complete system image that can be installed from any version. Both can be sideloaded, but Full OTA files are larger.
Will sideloading remove root or Magisk?
Yes, sideloading an official OTA will remove root and Magisk modifications. You’ll need to re-root after updating if you want to maintain root access.
Can I sideload beta/developer preview builds?
Yes, you can sideload Android Beta Program and Developer Preview builds using the same method. Download beta OTA files from Google’s beta website instead of stable channel.
What if sideload fails with “error: protocol fault (no status)”?
This usually indicates USB connection issues. Try different USB cable, different USB port, restart computer, reinstall ADB drivers, or try on different computer.
Can I use wireless ADB for sideload?
No, ADB sideload requires physical USB connection. Wireless ADB doesn’t support sideload mode in recovery.
How to exit recovery if sideload fails?
Use Volume keys to highlight “Reboot system now” and press Power. If stuck, force reboot with Power + Vol Down for 10+ seconds.
Will sideloading fix software issues?
Yes, sideloading a fresh OTA can fix many software glitches, performance issues, boot loops, and update-related problems without factory reset.
What minimum Android version needed?
Any Android version with recovery mode supports ADB sideload. The process has been available since early Android versions and works on all modern Pixels.
Can enterprises/managed devices sideload?
Possibly restricted by IT policies. Some managed devices may block recovery mode or ADB sideload for security compliance. Check with your organization’s IT department.
Difference between sideload and local update?
Sideload: Via ADB from computer. Local update: Select OTA .zip from device storage in recovery. Both methods install same OTA file without data loss.

Author:
Abdul MalikMobile Software Expert and founder of GSM6.com. Specializes in FRP bypass, IMEI repair, and advanced mobile tools. All tutorials are tested on real devices for accuracy and safety.